
First, pick your timer type—plug-in models work great for string lights, while in-wall timers handle hardwired porch lights, and smart timers give you app control.
Next, turn off power (safety first!), then install your timer in the right spot following the manual’s instructions.
Finally, set your schedule by adjusting pins on mechanical timers or programming times in your app, then test it out by watching your lights flip on and off.
Additional details in your manual will help you achieve a fully optimized setup.
Choose the Right Timer Type for Your Setup

Ever stood outside wondering which timer would actually work with your setup? Picking the right outdoor lighting timer requires understanding your options.
Picking the right outdoor lighting timer requires understanding your options and how your lights connect.
You’ve basically got three solid choices:
If your string lights or landscape lighting plug into exterior outlets, a plug-in timer works well—simple and straightforward. For hardwired fixtures like porch lights, you’ll want an in-wall timer that replaces your existing switch.
Then there’s the smart timer option for outdoor lighting control. You get app scheduling, voice commands, and remote access from anywhere.
Think about how your lights connect and what features matter to you. That’s all you need for choosing the right timer type.

[Countdown Timer and Light Sensor] The DEWENWILS timer has multiple settings like ON/OFF, dusk to dawn, on at dusk and off after 2, 4, 6 or 8 hours. You can control your outdoor device as you wish by simply setting it and can choose also to repeat schedule daily.
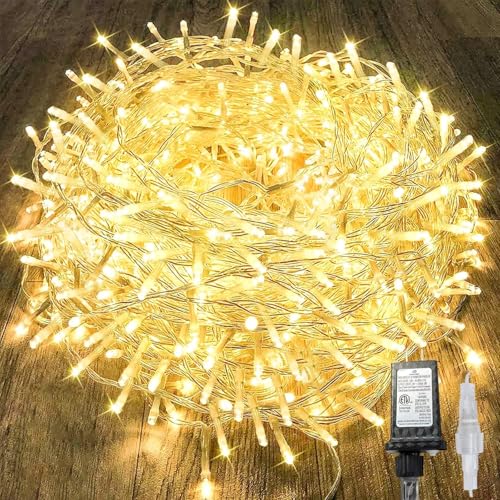
[Warm White Brighter Fairy Lights]: Our 88ft outdoor lights feature 240 warm LEDs - 20% more coverage than standard string lights. The fairy lights lso produces enough light during the day to give the environment a more ambient feel. And with its built-in memory function, your choices are recorded, allowing you to set your favourite lighting times and styles!

【Simple 48-Pin Mechanical Control】Set 48 pins for 30-min intervals. No buttons needed. This mechanical outlet timer repeats daily, perfect for Christmas decorations or porch lights.
Install and Wire Your Timer Safely

Now comes the part where safety really matters—before you touch a single wire, you’ve got to turn off the power to your lighting system. I’m serious, no shortcuts here. Grab your gloves and glasses because we’re keeping those hands and eyes protected during this safe electrical installation.
| Safety Gear | Purpose |
|---|---|
| Work gloves | Hand protection |
| Safety glasses | Eye protection |
| Wire stripper | Clean wire ends |
| Crimper tool | Secure connections |
Next, I’ll place my weatherproof timer in that GFCI outlet, following the manual’s hard-wiring instructions carefully. The outdoor timer wiring connects your low-voltage timer to the system, so take your time. Once installed, that protective cover and waterproof mounting bracket shield everything from rain and weather damage. Finally, I’ll test the GFCI outlet—flip that reset button and watch your outdoor lighting control spring to life.

✓ BLUE BACKLIGHT & 18 ON/OFF PROGRAMS: BN-LINK digital timer switch features a blue backlight, ensuring easy visibility and programming. Set up to 18 On/Off programs and 7-day scheduling options, you have the flexibility to tailor your lighting. Whether it's for lights, fans, you can set intervals as short as one minute and choose individual days or preset combination days, providing unparalleled customization and convenience.

✓ VERSATILE & CUSTOMIZABLE: BN-LINK digital timer switch sets up to 18 On/Off programs and 7-day scheduling options, you have the flexibility to tailor your lighting. Whether it's for lights, fans, you can set intervals as short as one minute and choose individual days or preset combination days, providing unparalleled customization and convenience.

Save time, money and energy by scheduling your indoor lights, outdoor lighting, fans or other devices - Ideal for ceiling lights, ceiling fans, exhaust fans, patio lights, and more.
Program Your Schedule and Test the Timing

Your timer’s sitting there all wired up and ready to go, which means it’s time to actually tell it when you want your lights on and off. For mechanical timers, you’ll push those pins or tabs to your desired On/Off times, making sure it’s in Timer mode. Digital timers need the current time set, then you program your events and switch to Auto mode. Smart timers? You’re scheduling through an app—much simpler. Here’s the important bit: test your programming by watching those lights actually turn on and off at the times you set. If they’re off, adjust accordingly. For multi-zone lighting setups, stagger your schedules so different areas don’t all flip on simultaneously. This simple testing confirms your outdoor lighting timer’s working properly.

【Long Wi-Fi Range and IP64】Long Wi-Fi range up to 300 feet with IP64 weather resistance. Waterproof cover is attached to protect it from dirt when not in use. Supports up to 15A/1875W.

[CONTROL MULTIPLE DEVICES]: BN-LINK Outdoor Smart Plug controls up to 3 devices simultaneously(NOT indiviudally controlled), making it easy to manage your outdoor electronics.

20A Heavy-Duty WiFi Smart Timer (1HP/2400W): Hardwired 120V smart switch designed for high-load circuits; supports 20A resistive/inductive loads. Suitable for pool pumps, water heaters, outdoor lighting, fans, and other heavy-duty applications


