
I’ll walk you through opening those between-the-glass blinds.
First, identify your window type and confirm the blinds sit between the panes, not outside. Unlock and disengage the clips around the frame—listen for that satisfying click. Gently hinge the glass pane open at about forty-five degrees, supporting it carefully. Now you’ve got access to adjust those slats with the magnetic slider or remote app. Keep everything propped safely while you clean, then re-engage each clip methodically until they’re locked tight. Stick around for the full breakdown of each step.
Know Your Pella Window Type and Control Mechanism

How’s your window supposed to open, anyway? Your Pella window could be a tilt-in double-hung, a casement that cranks out, or maybe an awning style. Each one works differently, and that matters, especially with Between-the-Glass Blinds tucked safely between those insulating panes. Forcing the wrong opening method can damage your windows—bent frames, broken hinges, and other problems. Your blinds aren’t operated from outside; they’re controlled by cordless magnetic sliders or motorized controls on the inside. Before you touch anything, locate your window’s model number or serial information. This step prevents problems later and protects your warranty. Your windows will function properly when you use the correct opening method.

✅ NOTE: Due to shipping length limitations,The blind sltas are rolled up,Before use,the slats are slightly bent at both ends,Please keep them on floor flat(Concave side down) for a while will make them to straighten up.Thanks for your understanding!

Package Contents: Includes 5 premium PVC vertical blinds replacement slats, providing ample supply for both routine maintenance. These replacement parts for blinds are designed to seamlessly integrate with your existing vertical window blinds for home, ensuring uninterrupted functionality. Each vertical blind slats replacement piece undergoes strict quality control to guarantee perfect compatibility with persianas verticales systems.
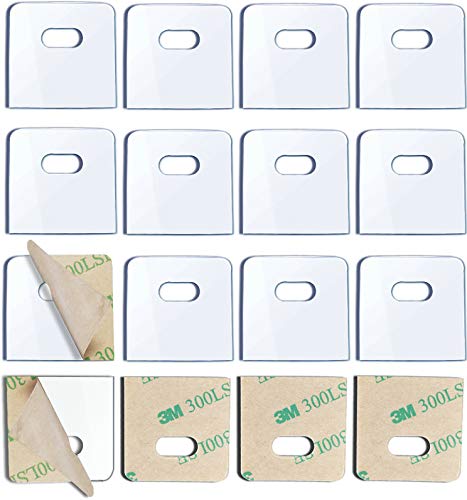
►【 Best Value Package 】-- A plastic bag contains 16 sets (total 32pieces)transparent vertical blind repair tabs. Before using the tab, you can clean the broken place of the blinds , increase the adhesive force, and permanently repaired them.
Confirm Your Blinds Are Between-the-Glass (Not Exterior or Interior)
Before you fiddle with your blinds, let’s make sure you’ve actually got the between-the-glass kind—you know, the ones tucked snugly inside those two panes of glass where they’re protected. I’ll walk you through spotting the difference between blinds that sit between the glass versus ones mounted on your window frame (either outside or inside), because honestly, it changes everything about how you’ll operate them. Once you confirm that sealed unit design and realize your blinds are right there in the middle, you’ll understand why they’re so low-maintenance and why they look so neat from the street.

Perfect Drywall Cutouts You Can Be Proud Of In Half The Time With No Measuring! Powerful Rare-Earth Magnets That Find Each Other Through Drywall, Eliminates The Need For Time Consuming, Error-Prone Measurements

✔️ 60 Pieces - There are 60 Pieces 1.18inch*1.18inch Vertical Blind Repair Tabs in the package. So you have a sufficient number of Verticle Blinds Snap in Replacement to fix all the Vertical blinds in your home.

⭐ Perfect Solution - You don't have to spend a lot of money on new Vertical Blinds Replacement Slats. this Vertical Blind Repair Tabs is a great solution that saves money and works well. This Vertical Blind Repair Kit can fix your blinds perfectly and keep them from falling down.
Identifying Between-The-Glass Location
Where exactly are your blinds hiding? I’m glad you asked, because pinpointing your between-the-glass blinds is the first real step toward confidently opening your Pella windows. Here’s what you’re actually looking for:
- Blinds nestled snugly inside the insulated glass unit, sandwiched between two panes
- No visible frame attachment or exterior mounting hardware
- A clean, integrated appearance with uniform white fabric visible from outside
- Protection from dust and weather—no, really, they’re basically living their best sheltered life
- Magnetic sliders or motorized controls operating your blinds, not traditional cords
When you peek at your window, you’ll spot that built-in look that shows Pella Lifestyle Series quality. Your between-the-glass blinds aren’t sitting on the frame like traditional blinds; they’re cozied up inside where they belong, creating that polished look you’re after.
Distinguishing Blind Placement Types
Now that you’ve spotted your between-the-glass blinds tucked inside the window, let’s make absolutely sure you’re not mixing them up with blinds that sit on the exterior frame or hang on the interior wall—because it matters for how you’ll operate them.
Here’s the thing: between-the-glass blinds live in their own space, nestled right between those two panes of glass. You won’t find them hanging outside collecting dirt and weather damage, and they’re not draped inside your room taking up space either. This hidden location gives them a real advantage—it means you’re dealing with a protected, low-maintenance system that’ll last. If you see blinds on your exterior trim or interior walls, those aren’t your between-the-glass setup. Make that distinction now so you’ll know exactly what you’re working with.
Verifying Sealed Unit Design
How can you tell for certain that you’re actually looking at between-the-glass blinds and not some other setup? I’ll walk you through the verification process, because knowing what you’ve got matters for opening them correctly.
Here’s what to check:
- Look inside the glass panes—your between-the-glass blinds sit snugly between two layers, not on exterior frames
- Spot the control mechanism: magnetic sliders or remote buttons indicate sealed-unit design
- Examine the exterior for seamless white fabric appearance with no visible hardware
- Check for internal clips and locks housed entirely within the glass assembly
- Consult your window’s serial number against Pella’s documentation
This verification step prevents you from fumbling with windows you don’t fully understand. Your Owner’s Manual contains the answers, and Pella support can confirm your specific model’s setup immediately.
Unlock the Window So It Can Open
Before you can swing those panes open and access your between-the-glass blinds, you’ve gotta release the clips holding everything in place—think of them as the bouncers keeping your window sealed shut. Start by disengaging the top and bottom clips around the frame completely. Next, slide the release along the edge until you hear that satisfying click, which tells you the clip’s doing its job. Once they’re loose, grab a hook-shaped tool or similar prying implement to help pull the unit open. For larger panes, don’t forget that extra third slide on the hinge-opposite side—it’s necessary to fully free everything up. Repeat these steps for each section, making sure all clips are disengaged before any hinge action happens.

✅SOPHISTICATED AND FUNCTIONAL - Dress up your windows and provide practical protection against the sun with our PowerSellerUSA 1'' Slat Cordless Window Blinds. The sophisticated look and easy care of these window blinds make them the top choice for blinds in any room. A certified natural elegance for your home. With wide slats that fit tight together, these cordless blinds for windows will create a cozy mood for sleeping, movie watching, and more!
✅SOPHISTICATED AND FUNCTIONAL - Dress up your windows and provide practical protection against the sun with our PowerSellerUSA 1'' Slat Cordless Window Blinds. The sophisticated look and easy care of these window blinds make them the top choice for blinds in any room. A certified natural elegance for your home. With wide slats that fit tight together, these cordless blinds for windows will create a cozy mood for sleeping, movie watching, and more!

Constructed of vinyl housing and latch with steel spring
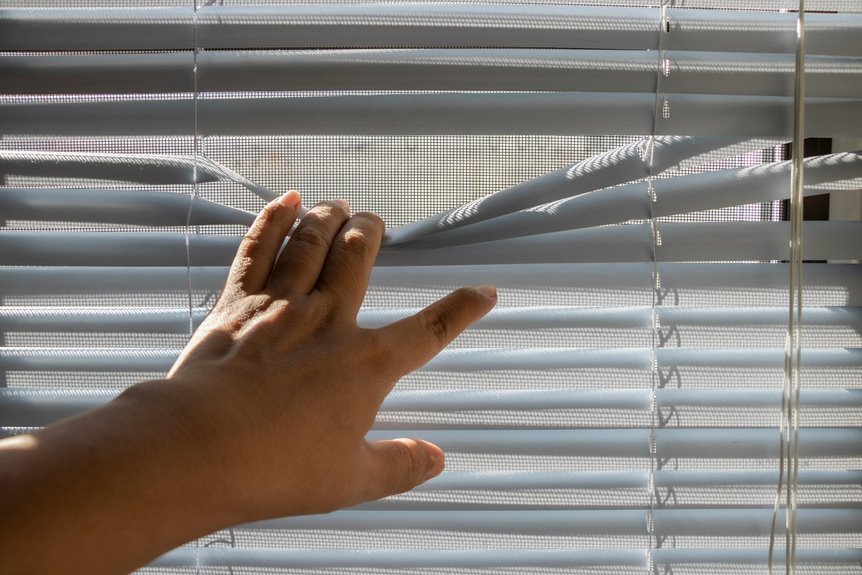
Open Your Glass Pane to Adjust the Between-Glass Blinds

With those clips finally loose and your window frame ready to cooperate, you’re all set to swing that glass pane open and get face-to-face with your between-the-glass blinds. Here’s what you’ll do next:
- Gently hinge the glass pane inward, moving slowly and deliberately
- Position it at roughly a 45-degree angle for comfortable access
- Keep one hand supporting the pane while you work (safety first)
- Check that all edge clips are fully disengaged before tilting
- Watch for any resistance—stop and recheck clips if needed
Once that pane’s at the right angle, you’ll spot your blind controls sitting right there between those glass layers. They’re finally within reach.

【Multifunctional Repair Tool】Designed specifically for disassembling car window handles, it can easily be inserted and removed from the car interior handles, avoiding excessive force that may damage parts and reducing secondary damage during the repair process. It is an ideal choice for auto mechanics and DIY enthusiasts.
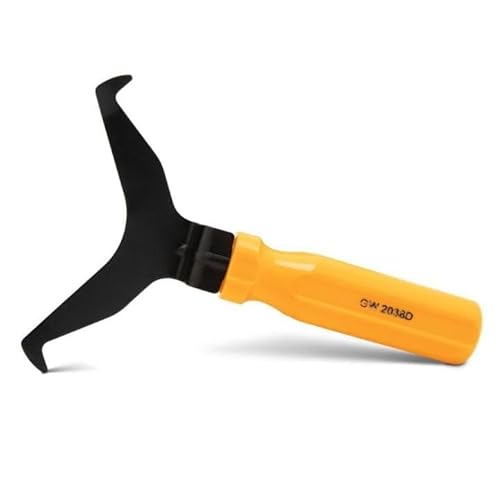
Window molding remover

Multi-Pack Set for Complete Cleaning: This set includes 2 blinds cleaner tools with 7-finger dusters and 2 mini vent brushes, covering both large surfaces and fine details. Perfect for cleaning blinds, air vents, car outlets, keyboards, and more.
Adjust Blind Slats With the Magnetic Slider or Remote App

Now comes the fun part—actually making those blinds do what you want them to do. You’ve got two options here, and both work well. If you prefer keeping things simple, just grab that magnetic slider on the side of your window frame. Push it up to raise the blinds, pull it down to lower them, or tilt it side-to-side to adjust those slats exactly how you like them. Want even less effort? Go motorized instead. With the Pella Lifestyle Series, you can control your blinds through a remote or your smartphone app—no reaching required. Whether you’re fine-tuning privacy, managing sunlight, or enjoying the clean appearance, these blinds work exactly when and how you need them to.

Clear Horizontal Mini Blind Slat Repair Kit

😀 Best Value Package -- A plastic bag contains 6 sets white Horizontal Blind Repair Tabs. It can be used simply and conveniently

Best Value Package:you will receive 20 pieces white horizontal blinds replacement slats in total, thickness of 0.03 inches, large and strong. suitable for most vinyl, PVC, fabric horizontal and vertical blinds.which is sufficient to meet your needs for repairing blinds. This means you can repair multiple curtains or fix multiple damaged areas
Keep the Window Propped Open While You Clean
Once you’re ready to tackle cleaning those between-the-glass blinds, you’ll want to keep your window safely propped open so it doesn’t accidentally swing shut on you while you’re working. Nothing’s worse than a window slamming while your hands are occupied. Here’s how to do it right:
- Use built-in hold-open features designed specifically for your Pella model
- Deploy a compatible prop to maintain steady support
- Engage tilt-release buttons to lock the sash safely in place
- Apply gentle support under the pane to prevent accidental closure
- Avoid forcing the window beyond its intended range

Range of Applications: white blind replacement wand is of good workmanship, it is smooth on the surface, and the hooks can easily be applied to Most kinds of windows, such as cordless blinds, honeycomb blinds and rolled shades.

SIZING MADE FOR 6 ft. 8 inch (80 INCHES) WINDOWS - Total blind measures at 82.5 inch (Length) x 3.5 inch (Width) made to cover most sliding glass doors, patio doors, living room windows, and large bedroom windows at 80 INCHES TALL (6ft. 8 inches)

✔【PACKAGING INCLUDES】: You will get 24 pcs vertical blinds replacement stems and gears (include 12pcs Stems and 12pcs Gears), sufficient quantity to meet your replacement requirements, you can also share them with your friends and family.
Close and Lock the Window When You’re Finished

When you’re ready to wrap up, slide those storm windows back into their spots along the edges—you’ll hear a click when all the top and bottom clips snap back into place. Next, slide every edge clip home first before closing that interior pane, and make sure any third release on the bigger panes is locked down tight with the hinge side completely disengaged. Finally, gently guide the whole window back into its frame, keeping the pressure even so nothing gets stuck or misaligned, then verify those locks or latches are fully engaged according to your specific model’s instructions.


Designed for Magnetic Metal Doors: Specifically made for metal doors to provide privacy and room darkening, suitable for both home and office spaces. To determine if your door is magnetic, test it with small magnetic items like fridge magnets, clips, or toys.

𝗤𝘂𝗶𝗰𝗸 𝗺𝗮𝗴𝗻𝗲𝘁𝗶𝗰 𝗶𝗻𝘀𝘁𝗮𝗹𝗹𝗮𝘁𝗶𝗼𝗻: Upgrade your windows with our QuickInsta MagMount system. No Tools, No Drilling, and no screws—just snap into place for instant privacy without the damage.
Secure All Clips Properly
How’s it looking so far? You’re almost done—now let’s lock everything down tight. I’m going to walk you through securing those clips properly, because this is where many folks slip up.
Here’s what you’ll do:
- Press the storm back into place until you hear that satisfying click
- Repeat the clip disengagement and re-engagement for each pane or section
- Slide clips along the edge in reverse until they click and hold firmly
- Verify center clips and any additional releases are fully secured
- Shake the frame gently to confirm no movement exists
When all your clips are engaged properly, your window stays sealed and protected. No airy gaps, no frustration. That final gentle shake is your confidence check.
Verify Complete Window Lock
The final step—and I really mean *final*—is making sure everything’s locked up tight before you walk away. After you’ve finished cleaning or drying those between-the-glass blinds, you’ll want to re-engage all the clips by pressing the storms back into place. Listen for that satisfying click on each engaged clip, no, really—that sound tells you the locks are secure. I like to go through each pane methodically, checking that every section is properly fastened. It takes maybe a minute, but honestly, it saves you from worrying later. Think of it as giving yourself peace of mind. When those locks click into place, you know your window’s protected and ready for whatever comes next.


