
First, kill the power at your breaker and verify it’s off with a voltage tester—this is a critical safety step.
Mount your weatherproof electrical box securely, then match wire colors carefully: black to black, white to white, and ground to ground.
Secure the fixture with even screw tension, seal everything against moisture, then restore power and test it out.
Following these steps will keep your lights working safely for years.
Turn Off Power and Verify Safety
Before you touch a single wire, you must kill the power—and I mean really kill it, not just flip a switch and hope for the best. Head straight to your breaker box and turn off the circuit that controls your installation area. Next, grab a voltage tester (this little tool is indispensable), and test those wires to confirm no live current’s running through them. Here’s the important part: disable any wall switches connected to that circuit so nobody accidentally flips it back on while you’re working. Now, safety verification doesn’t stop there—test those wires again with your voltage tester. Keep everything dry, avoid touching exposed conductors, and you’ll be ready to proceed. Smart electricians always double-check their work.

𝐈𝐏𝟓𝟓 𝐖𝐚𝐭𝐞𝐫𝐩𝐫𝐨𝐨𝐟 𝐑𝐚𝐭𝐢𝐧𝐠: At the heart of its reliability is an upgraded IP55 waterproof rating. Unlike IP54, which is likely to leak when hit by moderate, heavy, or oblique rain, IP55 keeps all rain out entirely. It includes 2 detachable wing covers for the cable ports, offering full protection for your electrical connections whether the box is wall-mounted vertically or placed flat on the ground. Ensure ultimate outdoor electrical safety and extend the lifespan of your appliances.

SIZE:Fits row plugs length<10". External size: 10.6” x 5.5” x 4.5”. Inner size: 9.8” x 4.7” x 3.4”, 6 cable ports, 4 snaps, 6 cable clamps, 6 rubber gaskets, Perfect for sealing 12/14/16 AWG/3C or fit up to Φ15mm cable(Hand-measured, slight error).

【Weatherproof Junction Box Outdoor】The waterproof Junction box is made of ABS and PVC plastic, IP66 waterproof rated. Solid construction and a good seal to protect against sun exposure, dust, corrosion,splashing water and rats. Very suitable for outdoor use.
Mount Your Waterproof Electrical Box
Now that you’ve got the power safely switched off, it’s time to mount your waterproof electrical box—the protective home for all your wiring. I’ll use a tape measure and straight edge to mark the exact location on my outdoor space, verifying everything’s properly aligned before I drill. Next, I’m selecting a sufficiently large box with gaskets that’ll shield my interior wiring from moisture and debris—this matters for longevity. I’ll attach it using construction adhesive for a secure seal and support. Before securing, I verify the box has proper knockouts or conduits for weatherproofing cable entries. Finally, I confirm it’s rated for outdoor use and compatible with my chosen fixture. This foundation sets up my outdoor lighting project for success.

Add or Relocate Wall Switches without Wiring: Suraielec wireless light switch and receiver kit eliminates the need for in-wall wiring; easily install wireless switches for lights without disrupting existing systems; no WiFi or fixture replacement required for remote control of your lights

Create 3-Way Switches Easily without Wiring: Suraielec wireless 3-way light switch kit eliminates the need for in-wall wiring; install a 3-way remote light switch to your existing lighting system without tearing down walls or replacing fixtures; no WiFi required

Add or Relocate Wall Switches without Wiring: Suraielec wireless light switch and receiver kit eliminates the need for in-wall wiring; easily install wireless switches for lights without disrupting existing systems; no WiFi or fixture replacement required for remote control of your lights
Wire Your Outdoor Light by Color

How’re you feeling about handling the actual wiring part—ready to play electrician?
Before you touch anything, grab your voltage tester and verify power’s off. Safety checks aren’t optional, friend—they’re how we keep our fingers intact.
Now, color-matching is your best buddy here. Black connects to black (that’s your live wire), white joins white (neutral), and green or bare copper links to green or bare copper (ground). Use wire connectors to join everything securely, then wrap those connections with electrical tape for extra protection.
| Wire Color | Purpose | Connection |
|---|---|---|
| Black | Live/Hot | To black wire |
| White | Neutral | To white wire |
| Green/Copper | Ground | To green/bare copper |
Take your time. Your outdoor light installation will be complete soon.

SAFETY FIRST: It will send out multiple alarms through sound and light. When the voltage is detected, the tip will send out red light and beep. When the higher the sensed voltage is, or the closer it is to the voltage source, it beeps at a higher frequency and the percentage value will be larger. At the same time, the screen will be red or green, red means high voltage and live wire are detected, green means low voltage and null wire are detected
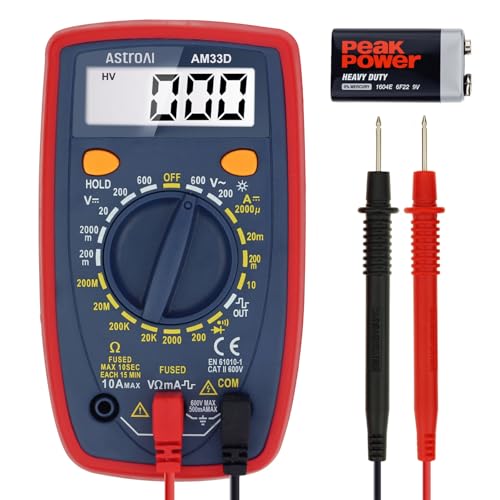
Additional Tips - The following incorrect operations may cause the multimeter not to show results: Firstly, the plugs of test leads are not fully inserted or not inserted into the correct sockets. Secondly, the manual rotary switch is not placed in the correct position. In addition, this meter can not test all AC Current and below 100mV AC Voltage. Please check the user manual carefully before measurement.

NON-CONTACT DETECTION of AC voltage in cables, cords, circuit breakers, lighting fixtures, switches, non-tamper-resistant outlets, and wires
Secure the Fixture to the Wall

Your fixture’s ready to go up, and this part’s where everything comes together—literally. I’m going to use the manufacturer’s specified mounting bracket screws to secure the fixture firmly against the wall, making sure it sits snug and straight. Before I attach anything, I’ll double-check that my junction box and wall surface are weatherproof and rated for outdoor use—no guessing games here. As I tighten each screw evenly, I’m watching for wobbling and keeping everything level and professional-looking. Once it’s secure, I’ll recheck my color-matched wiring connections to confirm they’re still protected. Finally, I’m applying weatherproof gaskets or sealant around the fixture’s edges, creating a barrier that keeps water out. Your outdoor lights are nearly finished now.

【Exceptional Protection】 Our ABS plastic enclosure provides exceptional protection for your electrical junctions, both indoors and outdoors. Designed to be waterproof, weatherproof, and dustproof with an IP67 rating, it ensures the safety and longevity of your power connections.
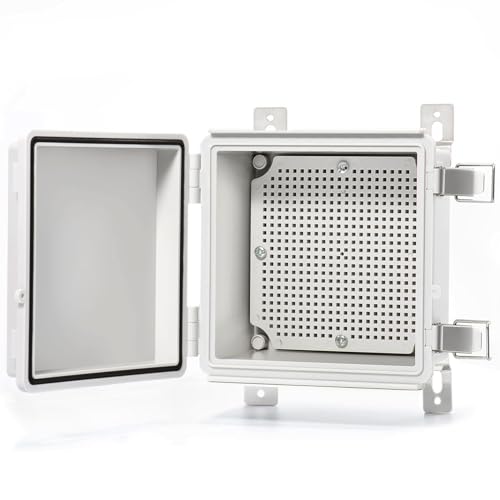
IP67 Waterproof: This waterproof junction box features an IP67 rating, providing reliable protection against water, dust, and other environmental challenges. Its robust design is perfect for both indoor and outdoor applications, ensuring your valuable electrical equipment stays safe in harsh environments—saving you from the hassle of replacements due to water damage

IP67 Waterproof & Built for the Outdoors - The junction box is IP67 waterproof certificated, built-in sealing gasket, offering complete protection against water, dust, and harsh weather conditions. Whether it’s rain, humidity, or snow, this box ensures your electrical connections stay safe and secure, making it perfect for outdoor use.
Restore Power and Test the Light

With your fixture locked down tight and all those wires connected properly, it’s time for the moment of truth—flipping that breaker back on and seeing if everything actually works. Head to your electrical panel, restore power carefully, then test your outdoor lighting by flipping the switch on and off. Watch for consistent, steady illumination—no flickering, no weird behavior. If it glows well, you’ve completed the job successfully. Double-check that all your connections stayed secure during power restoration, and make sure those mounting screws remain tight. Once testing confirms everything’s working properly, you’re ready for finishing details. Add some nearby decor if you’d like, then do a quick weatherproof check around gaps and seals. Your outdoor space now has improved lighting.
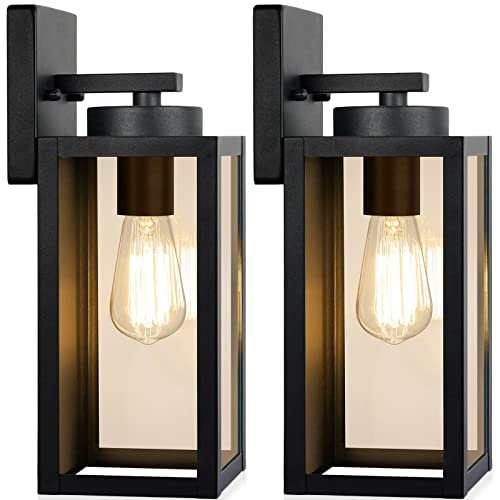
Weather-Resistant Outdoor Wall Lanterns: Constructed with a sturdy metal frame and thickened glass panel, this outdoor wall sconce is waterproof and built to withstand sun, rain, snow, and ice. The high-quality metal helps prevent rust and corrosion, making it suitable for long-term outdoor use.

Color: Silver Tone; Material: Galvanized Iron; Center Thread Size: 1/4"-20; Overall Dimensions: 100 x 18mm / 4 x 0.7 inch (L*W); Packing List: 2 x Light Fixture Crossbar Kit ( Each Kit included 1pcs crossbar, 1pcs green ground screw, 1pcs x silver countersunk screws), 2 x Screw Pack ( Each Pack included 2pcs self taping screws, 2pcs plastic tube)

Weather Resistant: Made of high-quality material, Our black exterior light fixtures are completely weather-resistant to withstand any outdoor environment, can be used durable for years. Suitable for any weather conditions like cloudy, heavy rain, snowy, icing, hot weather, etc


