
I’ll walk you through resetting your outdoor light timer—it’s easier than you’d think. First, check your GFCI outlet and flip any tripped breakers at your home’s panel. Next, identify whether you’ve got a digital timer with buttons or a mechanical one with a dial. Press the reset button for a few seconds, or power cycle by turning everything off for ten minutes. Then reprogram your on/off times, test after dark, and troubleshoot any hiccups by checking connections. Each step will help your outdoor lights run smoothly.
Check Your Power Source and GFCI Outlet

Have you ever noticed that your outdoor lights won’t turn on, and you’re standing there wondering what went wrong? Well, I’ve been there too, and the first step is checking your GFCI outlet, which is your outdoor safety device. First, look at that reset button—if it’s popped out, you’ve likely experienced a power outage or electrical fault. Press reset to restore power, and your lights should come back on. Before moving forward, verify the outlet’s actually working by testing it with another device (a simple lamp works great). If nothing happens, check your home’s breaker box for tripped breakers or blown fuses. Once you’ve restored power at the source, then reset that timer button again.

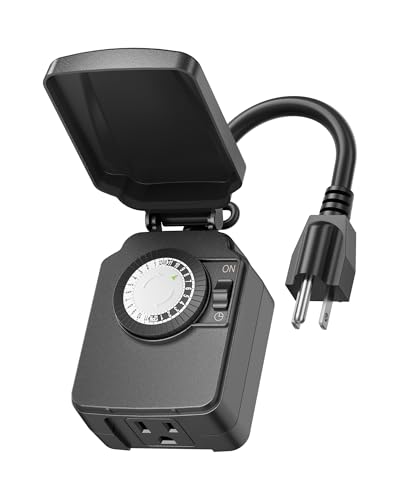
【Simple 48-Pin Mechanical Control】Set 48 pins for 30-min intervals. No buttons needed. This mechanical outlet timer repeats daily, perfect for Christmas decorations or porch lights.

✓ VERSATILE & CUSTOMIZABLE: Easily set up to 8 on/off programs for the timer’s two grounded outlets. Outlets are controlled simultaneously, and settings can be as short as one minute.

【Multiple Timer Functions】:Multi-functional outdoor light sensor timer, include 8 countdown functions (ON at dusk, OFF after 2h/4h/5h/6h/7h/8h/9h/10h), 2 switch functions (always ON/OFF),1 DUSK function (ON at dusk, OFF at dawn), repeats daily.
What Type of Timer Do You Have?

Once you’ve got power flowing back to your outdoor lights, it’s time to figure out what you’re actually working with—because not all timers are created equal. You’re either dealing with a digital or mechanical timer, and they work in completely different ways. Digital timers have LED displays and let you program everything with buttons, while mechanical timers use gears and little tripper pins you manually adjust. Identifying which one you’ve got takes about thirty seconds and makes the reset process more straightforward. Just peek at your timer—if it’s got a screen, you’re digital. If it’s purely dial-based with no electronics, you’re mechanical. Simple as that.

Designed to improve immunity for reduced High Frequency (HF) nuisance tripping. providing increased compatibility with appliances and other electronics

Side-Mounted GFCI Outlet & Easy Operation Controls: Equipped with a side-installed GFCI outlet and independent TEST/RESET buttons, this outdoor wall light allows for easy plug-in use and hassle-free operation. The indicator light under the TEST button clearly shows the circuit status in real time, providing double guarantees for both convenience and safety. In case of malfunctions, please check the indicator light status and refer to the troubleshooting instructions for quick solutions (Max power: 15A, Max load: 1800W).

【Safer and Power GFCI Outlet Design】Ours outdoor lights with outlets adopts a downward open design, more effectively preventing falling rain into the outlet and damaging it. With 2 receptacles, suitable for your 2 or 3-pronged plug equipment, Simply turn on the light and plug in and use your holiday decor lights, power tools, gardening tools, etc. (Max Current 15A and Max Load 1800W)
Reset Your Timer: Manual Button or Power Cycle

The easiest way to get your timer back on track is usually right there on the device itself—a little reset button that’ll do the work for you. Press and hold it for three to ten seconds, then watch that indicator light blink as your timer returns to factory settings. Straightforward, right?
Now, if your timer doesn’t have a reset button (no, really, some don’t), don’t worry—you’ve got another option. Turn off the power for five to ten minutes, then flip it back on. That power cycle works just as well.
Here’s the thing though: always check your timer’s specific instructions first. Different models sometimes need different button sequences, and you might need to re-enter your schedule afterward. Better safe than sorry.

【Easier New Programming Method】: No need for complex combination keys, just rotate the knob to the corresponding gear,you can easy to 6 sets of programs, which is simpler and more direct than the traditional key programming method.

Durable Carbon Fiber Composite Case & Nylon Strap.Built with a tough carbon fiber composite case, metal bezel, and a wear-resistant nylon strap, this digital sports watch is made to withstand outdoor use, fitness training, and daily wear. Lightweight design ensures comfortable long-term use.

Smart Automatic Watering Control: The Orbit Programmable Digital Hose Watering Timer transforms a faucet into an automatic watering system using a reliable single outlet hose timer
Reprogram On/Off Times for Your Schedule

So here’s where the real customization happens—now that you’ve reset your timer, it’s time to actually tell it when you want your lights on and off. For mechanical timers, I locate those little tripper pins on the dial and slide them to my preferred times. With digital timers, I access the program mode, select my days, and input specific on/off times directly. After adjusting, verify the clock displays the current time, because voltage fluctuations can throw everything off. Then double-check that all scheduled events match your on/off schedule. Finally, save the new settings to lock everything in place, preventing any loss after power cycles.
【Simple 48-Pin Mechanical Control】Set 48 pins for 30-min intervals. No buttons needed. This mechanical outlet timer repeats daily, perfect for Christmas decorations or porch lights.

Compatability: Plug-In Timer for use with Kichler's Professional Series, Plus Series and Contractor Series transformers (excluding 15CS75SS, which has a built-in timer)

[CUSTOMIZABLE 24-HOUR CONTROL] No matter the time of day, time of year, or season, the light timer is customizable to whatever needs you have. The DARK part of dial will designate night time, while the WHITE part of the dial will designate day time.
Turn on the Lights After Dark to Test

Now comes the moment of truth—you’ll want to stick around after dusk to see if your timer actually does what you programmed it to do, watching carefully as darkness triggers those lights to flip on right on schedule. I’d recommend observing them for the full cycle, from that initial activation through the entire duration they’re supposed to stay on, then confirming they shut down at your programmed off-time (this does matter). If anything seems off—like the lights don’t respond when darkness falls, or they won’t turn off when they should—you’ll need to circle back and check the timer’s power connection, reset positions, and those ON/OFF switches before you call it done.

Customizable Continuous Intervals: the on and the off repetitive intervals can be as short as 1s, and as long as 999 hours (about 41.5days), more flexible for your different needs.Please note: this timer doesn't allow programming based on actual time.


【Daily Repeat Mechanical Timer】: 48 ON/OFF setting options in 24 hours; each pins means 30 minutes interval; daily repeat your setting
Test Settings After Dark
Why wait until morning to check your work when you can verify everything’s running smoothly under the cover of darkness? Head outside after sunset and watch whether your lights flip on exactly when you’ve programmed them—timing matters here. Notice if they shut off right on schedule too. If something’s off, don’t panic; just double-check your settings once more. Make sure your timer’s actually powered up, connections aren’t loose, and nobody’s accidentally overridden your controls. Want to be thorough? Temporarily extend one ON interval so you can catch both the start and finish happening the same night. That’s your proof your outdoor timer works as intended. You’ve confirmed it yourself.
Verify Proper Light Activation
When your outdoor lights should be glowing but aren’t, it’s time to put on your detective hat and figure out what’s going on. I’d start by checking whether your transformer switch is actually ON—seriously, it’s the first thing I overlook. Next, I’ll verify that those ON/OFF pins are positioned correctly for after-dark activation, because honestly, they’re easy to misalign. Then I inspect the GFCI outlet and any inline connections for tripping or looseness that’d prevent my lights from turning on. If my outdoor timer still isn’t working, I review and adjust the scheduled times carefully. Finally, I run another test after dusk to confirm everything’s functioning. It’s frustrating when things don’t cooperate, but these steps usually get my timer performing exactly as intended.
Why Your Lights Aren’t Working: Diagnosis Steps

If your lights still won’t cooperate after that test run, I’d start by checking whether your timer’s actually getting power—sounds basic, I know, but a loose plug or tripped circuit breaker trips up more folks than you’d think. Next, take a closer look at how your timer’s wired and where those on/off pins or trippers are sitting, since even a slightly misaligned setting can leave you in the dark (literally). Once you’ve confirmed the power’s flowing and everything’s positioned correctly, you’ll usually find your culprit pretty quick.

[Countdown Timer and Light Sensor] The DEWENWILS timer has multiple settings like ON/OFF, dusk to dawn, on at dusk and off after 2, 4, 6 or 8 hours. You can control your outdoor device as you wish by simply setting it and can choose also to repeat schedule daily.
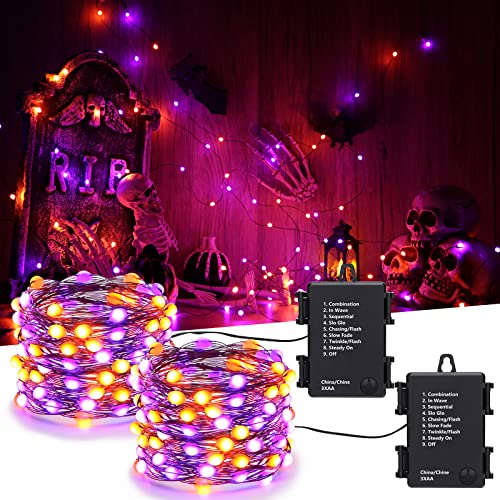
Battery Halloween Lights: The orange purple string lights are powered by a 3*AA battery(not included), press the button on the battery box to switch the orange purple lights On/Off and choose 8 different modes to satisfy your diverse needs

Battery Operated Easter Lights : Powered by 3*AA battery(not included), press the button on the battery box to switch the Easter lights On/Off and choose 8 different modes to satisfy your diverse needs.
Check Power Supply First
The first thing I’d do—and honestly, it’s the thing most of us skip—is confirm your timer’s actually getting power in the first place. I’ve been there, troubleshooting for an hour only to realize the transformer wasn’t plugged in!
Here’s what I check:
- Verify the transformer is plugged in and the ON switch is set to ON
- Inspect your GFCI outlet for a trip, then press RESET if needed
- Test other devices on the same outlet to rule out circuit issues
- Confirm no separate wall switch is controlling your outdoor timer’s power supply
If you’ve had a recent power outage, wait a few minutes after electricity returns before testing—your timer needs time to reboot. Starting here saves tons of frustration down the road.
Verify Timer Settings Positioning
Ever wonder why your outdoor lights stubbornly refuse to cooperate even though power’s flowing just fine? I’ve been there, and honestly, the culprit’s usually your timer settings positioning. Here’s what I check first: those little ON and OFF pins need to sit exactly where you want them on the dial, no exceptions. If they’re bunched together or floating outside the labeled intervals, you’ll get continuous light or total darkness instead of your planned schedule. I also verify the current time matches my outdoor light timer’s dial—seriously, an off-kilter time throws everything sideways. Don’t forget those AM/PM sections either; white means morning, dark means evening. Get your timer settings positioning right, and you’re set.
Keep Your Timer Accurate With Seasonal Resets

As daylight hours shift with the seasons, your outdoor light timer can start working against you—turning lights on when it’s still bright out or leaving your porch dark well after sunset. That’s where seasonal resets come in, keeping your outdoor lighting properly timed year-round.
I reset my timer twice annually (spring and fall), and it’s straightforward:
- Re-enter the current time on digital timers or adjust mechanical dials
- Review your ON/OFF settings to match new daylight patterns
- Align timer programs with timezone changes
- Set a calendar reminder so you don’t forget
These simple adjustments maintain energy efficiency and security, allowing your lights to work with nature instead of against it. Many outdoor enthusiasts keep their systems running smoothly all year long by following this routine.
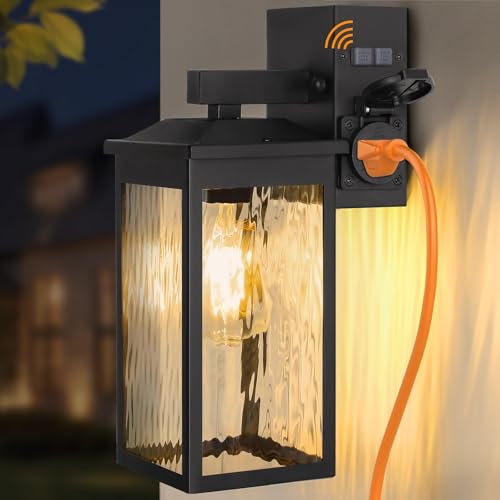
Convenient Side-Access GFCI Outlet & Controls: Designed with a side-mounted GFCI outlet and separated TEST/RESET buttons, this patio light enables smooth plug insertion and simple control. The indicator light beneath the TEST button provides immediate confirmation of circuit status, ensuring both convenience and safety. If you encounter issues, please observe the indicator light's status and refer to the troubleshooting guide in Image 9 (main image) for quick problem-solving (Max power: 15A, Max load: 1800W).

【Safer and Power GFCI Outlet Design】Ours outdoor lights with outlets adopts a downward open design, more effectively preventing falling rain into the outlet and damaging it. With 2 receptacles, suitable for your 2 or 3-pronged plug equipment, Simply turn on the light and plug in and use your holiday decor lights, power tools, gardening tools, etc. (Max Current 15A and Max Load 1800W)

Convenient 2 GFCI Receptacles: Comes with GFCI outlet with 2 receptacles, this outdoor light with outlet provides easy access for your outdoor power supply like party lighting, leaf blower, lawn mower, BBQ grill, CCTV camera, etc. Different from other patio lights, the downward open design could more effectively prevent falling rain into the outlet. It also has additional protection against power surges, short circuits, and other accident electrical faults, protecting your circuit from damage.


