
Hanging a heavy ceramic plate safely requires a few straightforward steps. First, identify your wall type (drywall, plaster, or brick), then select hardware rated for your plate’s weight. Build a flush mount using notched cleats anchored into studs, hang it carefully, and test for wobbles. Finally, secure everything with quality fasteners and check periodically for any movement. Follow these steps, and your plate will remain securely displayed for years to come.
Check Your Wall Type Before Hanging Heavy Plates
Ever wonder why your friend’s beautiful ceramic plate came crashing down last month? The culprit’s usually not the plate itself—it’s hanging it wrong. Here’s the thing: before you grab a hammer, you’ve got to identify your wall type, because drywall, plaster walls, and masonry surfaces each demand different strategies.
If you’ve got drywall (most common), you’ll need stud anchoring or heavy-duty toggles to support your heavy ceramic plate securely. Plaster walls? They’re trickier and require toggle bolts that distribute weight better. Masonry anchors work best for brick or concrete—no, really, they’re designed specifically for these surfaces.
Take five minutes to figure out what you’re working with. Run your knuckles along the wall, peek behind outlets, or just ask yourself honestly what your home’s made of. This simple step prevents disaster.

Anchors pre-drills precise hole in types of drywall ,no hole preparation required, made of durable zinc .

1. 45 Sets All-in-One Kit for Instant Use Includes 45 self-drilling drywall anchors (0.47” diameter × 1.18” length) and 45 flat-head self-tapping screws (1.18” length), all neatly packed in a reusable plastic case. No more searching for matching parts—everything you need for 45+ wall-hanging projects is ready to go.

TOGGLER SNAPTOGGLE Drywall Anchor – 1/4"-20 UNC Zinc-Plated Snaptoggle Anchors – Holds 265 lbs on Drywall, 802 lbs on Concrete Block – Toggle Bolts for Mounting Cabinets and TV – 20 Pack (With Bolts)
Pick Hardware Built for Your Plate’s Weight
Now that you’ve figured out what your walls are made of, it’s time to match your hardware to your plate’s actual weight—and I mean really match it, not just guess and hope for the best. If your ceramic plate weighs over 20 pounds, you’ll want backer plates with D-rings or a French cleat system anchored directly into studs. This load-bearing approach spreads weight across multiple points instead of relying on one weak spot. Skip the adhesives entirely; they won’t cut it for heavy pieces, no matter what the label promises. For maximum safety, I’d recommend attaching screws into a stud or using multiple anchors. Your plate will hold securely with hardware that performs as intended, and your walls will remain intact.
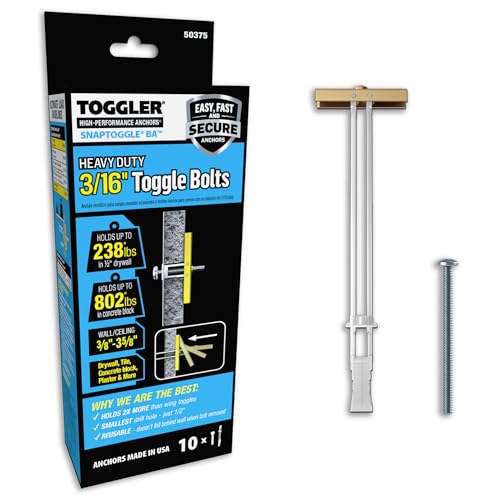
Superior Holding Power – Supports up to 238 lbs in 1/2" drywall and 802 lbs in concrete, ensuring a secure, vibration-resistant hold for TVs, shelves, grab bars, and heavy-duty fixtures.


HEAVY-DUTY HOLLOW WALL ANCHORING STRENGTH: These toggle bolt anchors offer strong support for hollow wall installations, with an expanding toggle mechanism that creates a secure grip behind the wall for mounting shelves, mirrors, and décor.
Build a Flush Mount With Notched Cleats

Want your ceramic plate to hug the wall as part of the surface itself? A French cleat system with notches keeps your heavy ceramic flush and level. Here’s how this approach works: the notched backside of your plate creates a precise fit for the cleat, keeping your wall anchor perfectly level without wobble.
| Step | What You Do | Why It Matters |
|---|---|---|
| Cut notches | Create slots in backside | Guides exact cleat placement |
| Prepare surface | Clean, flatten back | Maximizes adhesion and stability |
| Secure cleat | Screw into stud or drywall anchors | Distributes weight across two points |
This two-point support system prevents warping and reduces stress on your drywall.

Valuable Cement Anchors And Screws Kit:This is a great value pack,Includes 30PCS # 12-16 (1.38 "length) anchors, 30PCS # 10 (1.58" length) screws, 60PCS # 10-12 (1.06 "length) anchors, 60PCS # 8 (1.18" length) screws, and 2PCS drill bits suitable for anchors, box packaging

STRONG MATERIAL – All the blue concrete anchors and screws are made of selected materials with premium quality just to ensure the best performance. The Philips screws are made of high-strength carbon steel and finished with galvanizing technology, which is highly resistant to rust and corrosion. The concrete anchors are made of new PE material for higher strength and better resistance to rub and aging.

Hang the Plate and Test for Wobble

How do you know if your ceramic plate is really secure? I mark my wall with a template, then install anchors exactly where I’ve marked. Once I hang the plate using a quality plate hanger, I gently nudge it from the sides—no, really, this wobble test matters. I slide it slightly to check for movement and adjust the hanger bends if needed. Adding felt pads at contact points reduces sway. For particularly valuable pieces, I’ll attach a discreet safety tether because shifting plates aren’t just annoying—they’re risky. Testing thoroughly means you can rest assured your treasured ceramic stays exactly where you left it.

The french cleat allows for level picture/mirror and art hanging every time for a reliable, neat aesthetic

PRECISION 2.5″ CLEAT CUTS: Our jig is engineered to produce uniform 2.5″ French cleat boards with clean 45° cuts, helping you create matching cleat hanger pieces for wall organizers, cabinets, tool holders, and workshop storage layouts with consistent accuracy

Strength - Picture hanging kits support frames of all sizes up to 60 lbs. for picture frames, whiteboards, headboards, decorative items, art paintings
Lock Down Level and Prevent Future Movement

Once you’ve confirmed your plate isn’t going anywhere with that wobble test, it’s time to really lock things down—because a plate that stays put today might start creeping tomorrow if you don’t secure it properly.
Here’s what’ll keep your ceramic piece exactly where you want it:
- Use mechanical support like backer plates screwed into studs rather than relying on adhesives alone
- Install plate hangers rated for your piece’s weight across two anchor points
- Re-check all fasteners seasonally and replace wall anchors annually
- Verify your level reading matches the template marks you made during installation
- Test the plate monthly by gently lifting—no, really—to catch any loosening early
This approach means your beautiful ceramic stays protected and stationary, giving you peace of mind every time you walk past it. You’re building something that lasts.

Invisible Mount: The mounting brackets stays hidden for a sleek, floating look. Each 41-inch interlocking Z clip locks your mirrors, cabinets, or artwork firmly in place while keeping the hardware out of sight

Extremely Solid and Durable Heavy Duty Picture Hanging Kit-Including 6 Sets0.08“thickness heavy duty picture hangers hooks,heavy picture hanging hardware Comes with mounting screws and wall anchors.The two interlocking french cleat hanger for hanging mate perfectly to form a solid,It to be repeatedly installed and separated,can withstand 100lb bed, furniture frame brackets,It ensures stability and long-term use, preventing the object being installed from falling.

SUPER STRENGTH: Our wall cleat has the ability to hold up frames of all sizes, supporting up to 50 pounds. Each set includes three pairs of aluminum pieces, so get ready to finally hang those antique frames you’ve had put away all these years.


