
Wedging is when you knead clay—seriously, no, really—to squish out air bubbles, spread moisture evenly, and line up those clay particles so they actually cooperate with you. I can’t stress this enough: skip it, and you’ll hit weak spots mid-project that’ll wreck everything. You’ve got three main techniques (spiral for big batches, ram’s head for beginners, and cut wedging), but honestly, the real trick is using your whole body, not just your arms, so you don’t end up sore. Get the stance right, and you’ll develop what makes clay actually workable.
What Wedging Does (and Why You Can’t Skip It)

Ever wondered why potters spend so much time squishing clay before they actually make anything? I’ll tell you—it’s because wedging makes your clay into something actually workable. When I wedge, I’m doing serious work: distributing even moisture throughout, aligning those clay particles so they cooperate with me, and crushing out air pockets that’d otherwise sabotage my pieces. Those tiny air bubbles? They’re sneaky trouble-makers that cause weak spots, uneven walls, and honestly, kiln explosions nobody wants. By wedging properly, I’m boosting my clay’s plasticity—making it actually bendable and strong. The result is uniform texture with consistent moisture, no question. This prep work means I’m not starting from scratch every time. Whether I’m throwing on the wheel or hand-building, that solid foundation makes everything that follows genuinely easier.

PACKAGE INCLUDES - 2 x Sculpting Tool.

Material&Size: This pottery trident is made of high-quality plastic, hard, textured and not easy to deform. 6inch length is suitable for most shape

18 Pieces in Total: This set of clay tools contains most of the basic tools you may need for pottery making and sculpting. They are great for carving, cutting, chipping, modeling, trimming, smoothing, etc.
Essential Tools and Workspace Setup

When you’re wedging clay, position your work surface at waist height to reduce back strain, and use a sturdy table or clamp boards that stay stable during work. Proper posture—standing with one foot forward and pushing from your core rather than relying on your wrists—prevents cumulative strain on your body. You’ll need a wire tool and a porous surface like wood or canvas to regulate clay moisture absorption. Consider keeping a scale nearby to maintain consistent weight across your clay balls.

ERGONOMIC DESIGN: Crafted with a wooden handle featuring polished grooves, this Pottery Sculpting Tool ensures comfort and control for ceramic artists during extended use....
Work Surface Height Matters
Why’s your back already hurting after just a few minutes of wedging? Your wedging height is probably wrong. I learned this the hard way—slouching over a too-low table actually damages your spine. Here’s the thing: your work surface should sit right at waist height when you’re standing. This adjustment improves your comfort and safety.
A stable work surface matters too, no, really. I clamp my boards down so nothing shifts around, protecting your back and reducing injury risk. Then I adjust your ergonomic stance: one foot forward, bracing your waist against the table. This engages your whole body, not just your tired wrists.
When your setup’s right, you’ll notice immediately how much stronger and safer you feel. Your back will thank you.
Stability and Clamp Requirements
How solid is your wedging setup, really? I’ve learned that a wobbly work surface will sabotage your efforts faster than wet clay can slip through your fingers. I clamp my boards or secure my table firmly—no, really, this matters—because even tiny movements throw off my rhythm and tire me out unnecessarily. Your work surface needs to stay put while you’re pushing and folding that clay. Think of it like this: stability in your workspace creates stability in your hands. When everything’s locked down tight, I can focus purely on the wedging motion itself, not fighting against a shifting surface. It’s one of those small details that makes a real difference, building my confidence as I work.
Posture and Body Alignment
Your whole body’s got to work together during wedging, and that starts with how you’re standing. I’ve learned that wedging posture isn’t about looking perfect—it’s about setting yourself up for success, you know? I position one foot forward, brace my waist against the table, and engage my core for stability. This body alignment lets me push from my whole self, not just my tired arms.
| What to Do | Why It Matters |
|---|---|
| Stand with feet apart | Gives you balance and power |
| Keep waist at table height | Protects your back from strain |
| Engage your core | Creates solid body alignment |
| Use whole-body pressure | Makes wedging easier and safer |
| Adjust when tired | Prevents poor posture habits |
When my shoulders start hunching, I shift my stance and remind myself: good wedging posture wins the day.
Master the Ram’s Head Technique

Now I’ll show you how to actually make the Ram’s Head technique work for your hands and body, because—no, really—it’s all about using your whole self, not just your wrists. You’ll start noticing visual signals as you wedge, like those galaxy folds forming at the bottom and the subtle spiral that creeps along the sides, which tell you exactly when you’re doing it right. As you practice refining your form with each push and rock, you’ll find your rhythm and build the muscle memory that makes this stepping stone technique feel natural before you tackle the trickier spiral moves.
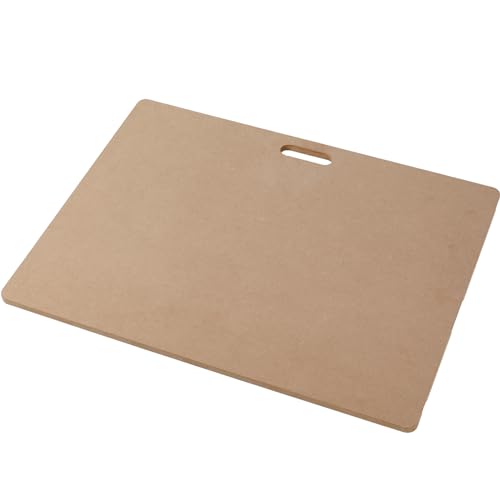
Portable Clay Wedging Board: Our lightweight and durable clay wedging board features a built-in handle, making it the ideal choice for artists on the move. Whether you're heading to the classroom, taking your work outdoors, or seeking a change of scenery at home, our versatile clay board has you covered.
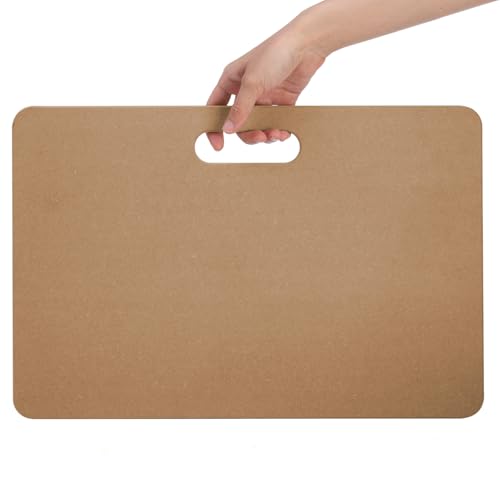
Wedging Board for Pottery: you will receive a durable clay wedging board, measuring 11.7×17.6 inch, with 8mm thickness, thick enough for a long time use.

Clay wedging board has a comfortable built-in handle for easy carrying,when not in use, can be hung on where there is a hook or nail, space saving.
Body Mechanics And Stance
Ever notice how some potters wedge clay like they’re wrestling it, while others seem to barely break a sweat? The difference lies in your postural stance and body mechanics. Here’s what I’ve learned: stand with one foot forward, brace your waist against the table, and let your core do the heavy lifting—not your wrists. Your wedging technique actually depends on engaging your whole body. I position myself so the work surface sits at waist height, then rock the clay using my heel and body weight in that spiral, ram-like motion. It feels counterintuitive at first, but when you rely on your stance instead of muscling through, the clay responds better. You’ll notice you’re not exhausted afterward, either.
Visual Cues For Progress
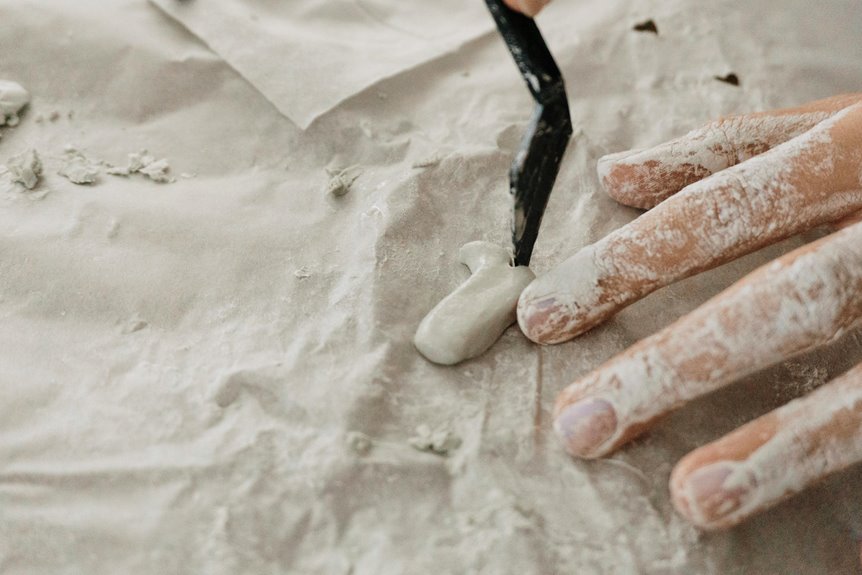
As you’re wedging, the clay starts telling you stories—and I’m not being poetic here, I’m talking about actual visual signals that show you’re doing it right. Watch for the Ram’s Head shape forming at the bottom of your clay ball. Those galaxy folds and subtle spirals along the sides indicate you’re creating uniform moisture. That’s your wedging working properly. Once you see this pattern developing, you’re getting close to ready, but don’t stop yet. Here’s my practical move: grab a wire cutter and halve your ball to check for air bubbles hiding inside. If you see nothing but smooth clay throughout, you’ve succeeded. That clean cross-section confirms you’ve wedged completely and your clay’s ready for throwing.
Refining Your Wedging Form
Once you’ve spotted those galaxy folds and know your clay’s getting there, it’s time to refine your technique—and that’s where the Ram’s Head method proves valuable. Here’s what happens: you’re not just using your hands anymore. I use my whole body, engaging my core strength to push and roll the clay forward and back. This wedging technique reduces fatigue while achieving even moisture distribution throughout.
Place the clay between your palms, thumbs across the top, then apply steady inward pressure with your heels. You’ll feel the difference immediately—the clay responds better, resists less. Keep checking those halves for air pockets; when they’re gone, you’ve developed a deeper understanding of your material. This approach changes how you work.
When Your Clay Is Ready to Use

How do you know when your clay’s actually ready to work with? Checking a few key signs helps you achieve smooth throwing and avoid frustrating sessions.
After wedging, look for:
- Consistent moisture distribution throughout the entire ball
- No stiff spots when you squeeze and bend the clay
- A smooth, ram’s-head-like appearance in the mass
- Uniform texture that feels evenly malleable in your hands
- A wire-cut test showing zero air pockets when you halve it
When you hit all these marks, the clay feels alive. Shape it into a cylinder or cone, depending on what you’re making. That’s when you know you’re ready to throw or hand-build something worth keeping. You’ll recognize it too—it’s that satisfying moment when everything feels right.

Plant pot looks simple, clean and elegant. Ideal for suitable for windowsills, tables, bedroom and garden 1. The rough terra cotta material is breathable and durable, making...
Three Wedging Approaches and When to Pick Each

Why do potters argue so much about wedging technique? Because finding your method matters—it’s personal, it works for your hands, and honestly, there’s no single “right” way.
| Method | Best For |
|---|---|
| Spiral | Large batches, thorough air removal |
| Rams Head | Beginners, learning coordination |
| Cut | Quick moisture homogenization |
I’ve found that your choice depends on batch size and what your body can handle. Spiral wedging, sometimes called Japanese wedging, dominates large clay quantities through its snail-shell folding pattern. Rams Head bridges beginner-friendly technique with advanced practice, using both hands on opposite sides. Cut wedging—slicing, stacking, slamming—offers variations depending on wire angles.
Your comfort matters. Start where you feel confident, then explore. That’s how you’ll discover wedging that becomes second nature.

MORE CONSISTENT POTTERY EVERY TIME-Take the guesswork out of throwing. This pottery throwing gauge helps you control height, width, and depth with better accuracy, making it...
Wedging Without Injury: Posture, Alignment, and Fixes

Most potters don’t realize their body’s doing half the work they think their hands are—and that’s actually good news, because it means you can wedge for hours without turning your arms into overcooked noodles.
Here’s what protects you:
- Stand with one foot forward, bracing your waist against the table for core engagement
- Set your work surface at waist height and clamp it down tight
- Push from your whole body, using a rocking motion with your heel
- Watch for arm tiredness as your signal to adjust stance
- Keep your environment stable before you even start
Your wedging posture isn’t just about looking cool—it’s your injury prevention plan. When you use your core instead of muscling through with just your arms, you’re building a safe technique that lets you keep creating, session after session, without pain or regret.
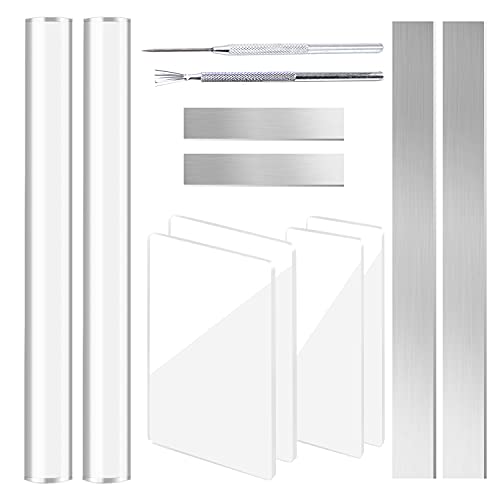
Product Details: 4 pieces clear acrylic rectangle sheets, 2 pieces transparent acrylic clay slab rollers (one solid and one hollow), 4 pieces pottery clay cutters, including 2 long tissue blades and 2 short knives, 1 wire texture tool and 1 needle detail tool.

Precision Scoring Made Easy: Elevate your crafting with our Retractable Scoring Tool, a must-have for pottery, clay modeling, and other detailed projects. This tool guarantees clean, accurate lines every time, making puncturing effortless and swift compared to traditional needle tools. Crafted from high-quality ABS and stainless steel, it withstands rigorous use, ensuring precise results that last. Perfect for professional artists and hobbyists alike, it's a reliable addition to your toolkit.

Ceramic Clay Tools Set- A set of 8pcs pottery clay sculpting tools of different shapes. 8pcs tools include: modeling tool, ribbon tool, loop tool, potters rib, wire clay cutter, metal scraper, needle tool and sponge.


