
You’ve got solid options—no nails required. Adhesive hooks work great on clean surfaces and hold 1–5 pounds each, spaced 12–24 inches apart.
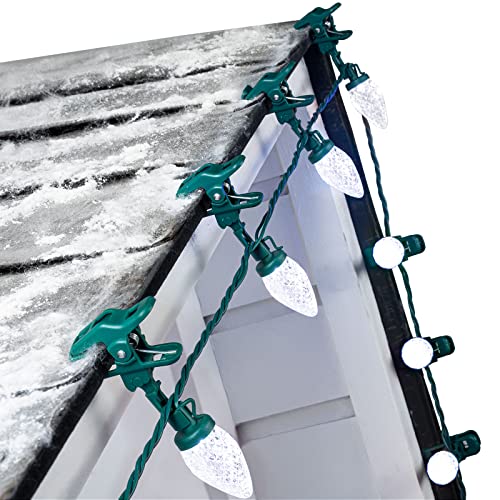
Gutter clips attach directly to rain gutters with zero tools needed.
Cable ties secure your lines to railings, and the pole-in-planter method uses sand-filled planters as portable anchors.
Plan your spacing first, test on the ground, and aim for that café-style sag (10–15% per span).
Matching the right method to your setup delivers the best results.
Why Nails Aren’t Your Only Option: Damage-Free Hanging Methods

Ever worried that hanging outdoor string lights means you’re stuck hammering nails into your beautiful home? Here’s the good news: you’ve got options, and they’re damage-free, too.
Adhesive hooks are perfect for renters like us who can’t risk losing security deposits. They stick to smooth, clean surfaces without leaving a trace. Then there’s gutter clips—my personal favorite—which attach straight to your rain gutters without any tools needed. You can space them 12–24 inches apart for perfectly even lighting, and honestly, they’re nearly invisible once installed.
These renter-friendly methods mean you’re choosing a practical solution that works. Your walls stay pristine, your landlord stays happy, and your patio looks great. No nails required, no stress involved.

[ Strong adhesive ] Our newly upgraded adhesive features ultra-high adhesion waterproof adhesive strips, solving the problem of falling decorations. It is easy to remove without leaving unsightly marks on walls

【3X Stronger Adhesion – Won’t Fall Off in Rain】Upgraded with 3X stronger adhesive than standard double‑sided tape. These clear heavy duty clips stay locked on wood, metal, vinyl siding, glass, gutters, tile, painted drywall, and smooth plastic – even in rain, snow, or high heat. No more climbing a ladder to re‑stick fallen lights.

Sturdy and Durable: Package include 30 pcs clear adhesive christmas light clips. Base 1.57”x 0.9”, Inner Height 0.2”. The double-hook design and the use of high-quality PA66 materials make our string light hooks sturdy and durable, no worry about light clips for outside string lights falling off.
Adhesive Hooks: Hang Lights Without Nails or Holes

Adhesive hooks are my go-to method, and once you understand how they work, you’ll see why they’re such a practical solution for renters and homeowners alike. These weatherproof adhesive hooks stick directly to your surface, creating a damage-free hanging solution that actually works.
Here’s what makes them effective:
- Easy installation: Clean your surface, press firmly for 30 seconds, wait an hour, then hang your lights
- No permanent marks: You remove without holes, preserving your walls or siding completely
- Reusable strips: Replacement adhesive keeps them working season after season
The setup’s straightforward. Space your hooks 12–24 inches apart, and they’ll support 1–5 pounds depending on the style. Sure, extreme cold can weaken adhesion, but the convenience is worth it. You’re joining countless people who’ve ditched the damage.

Well Built: Christmas light clips are made of semi flexible PP material, lightweight yet sturdy; not easy to break when inserting or pulling out the wires; durable and weatherproof, through high heat, wind, rain, snow storms with no issue; compact black appearance blends in well with home decor

Well Built: Christmas light clips are made of semi flexible PP material, lightweight yet sturdy; not easy to break when inserting or pulling out the wires; durable and weatherproof, through high heat, wind, rain, snow storms with no issue; compact translucent appearance blends in well with home decor Well Built: Christmas light clips are made of semi flexible PP material, lightweight yet sturdy; not easy to break when inserting or pulling out the wires; durable and weatherproof, through high heat, wind, rain, snow storms with no issue; compact translucent appearance blends in well with home decor

Strong metal drain clips: These light clips are made of high quality galvanized steel and manganese, with material upgrades from plastic easy to break, designed for outdoor use, the material is strong and durable, and not affected by any wind, snow, rain and hot weather.
Cable Ties & Railings: Quick Secures to Existing Structures

What if your deck railing or porch support could become the perfect anchor for outdoor string lights—no drilling, no damage, no fuss? Cable ties work well for this purpose. I space them every 12–18 inches along railings, securing my outdoor string lights with even tension and minimal sag. The benefit? They’re temporary and completely damage-free, which means I can install them on metal railings or wooden decks without leaving a trace.
For longer spans, I combine cable ties with exterior-rated clips to keep everything neat and tidy. I always choose UV-resistant, weatherproof ties that handle sun exposure and temperature swings effectively. The key is loosening them just enough so wind doesn’t restrict movement, yet tight enough to prevent drooping. It’s one of the simplest installation methods available.

【2ft Denser & Brighter Spacing】Loniuto's 96ft outdoor string lights are equipped with 48+4 high-quality LED bulbs. With bulbs spaced only 2 feet apart, they deliver a denser, fuller, and continuous stream of light. Featuring specially thickened warm filaments and a 2700K soft golden glow, they cast a delicate and even cozy radiance, instantly elevating the ambiance of any space.

Full-Function Remote & Timer - Create the Perfect Outdoor Ambience: Adjust brightness (25–100%), light speed, and 3 effects(steady/breath/flash)with one remote. Set 6/8/10-hour timers for hands-free night lighting—no extra dimmer or timer required

【Versatile Charging Options】These outdoor solar string lights can be charged by sunlight for up to 10 hours or via USB when sunlight is limited. Enjoy the convenience and flexibility of updated charging options in your everyday life;
The Pole-in-Planter Trick: Instant Anchors Without Drilling

You can skip the drill entirely and use sturdy planters filled with sand or gravel as freestanding anchors instead. This pole-in-planter method works well for creating that cafe-bistro vibe.
What makes this method practical:
- No drilling needed, which means renters can decorate without landlord issues
- Easy relocation whenever you want to refresh your space or adjust to seasonal changes
- Wind-resistant anchors that stay put because the sand and gravel provide serious ballast
You’ll adjust spacing between planters to get your desired light pattern, and you’ll have defined lines along walkways or seating areas. This non-permanent setup gives you creative freedom while looking professionally executed.

Triple Duty PWC Gear: Constructed with heavy duty PVC material, fill this handy bag with sand and anchor your jet ski and paddle board! Or, leave it empty and fold the roll top to use as a buoy or use it as a dry bag for your personal items!

Triple Duty PWC Gear: Constructed with heavy duty PVC material, fill this handy bag with sand and anchor your jet ski and paddle board! Or, leave it empty and fold the roll top to use as a buoy or use it as a dry bag for your personal items!

【No More Worries 】: Tired of worrying if your anchors will hold? Imagine a BEAUTIFUL DAY at the beach or sandbar WITHOUT WORRYING if you watercraft will stay put! Easy to use anchor pole for boat.
Where & How to Hang Lights for Even Spacing

How do you keep those string lights from looking like they’re dancing the cha-cha across your patio? Proper spacing is the answer—pre-counting your sections makes a real difference. Space your clip or hook intervals at 12–24 inches apart, depending on how dramatic you want that drape, then test everything on the ground first before transferring to your actual mounting points. This keeps spacing consistent. Use gutter clips or adhesive hooks (no drilling required), making sure they all face the same direction for that straight-line aesthetic. For even distribution, leave about 10–15% sag per span for that café-style vibe while maintaining tension that won’t stress your setup. Your guests will appreciate the attention to detail.

【APPLICATIONS】Black coated stainless cable is easy to hide at night. Our light hanging kit can be used in multiple ways such as hanging string lights for a romantic party, photos or any hanging needed. And you can design different lighting suspension types to enhance the visual effect according to the layout of your yard. Our string light hanging kits is also suitable for Indoor: Hanging photo frames, dry clothes and facilities for sunbathe at day.

【APPLICATIONS】Black coated stainless cable is easy to hide at night. Our light hanging kit can be used in multiple ways such as hanging string lights for a romantic party, photos or any hanging needed. And you can design different lighting suspension types to enhance the visual effect according to the layout of your yard. Our string light hanging kits is also suitable for Indoor: Hanging photo frames, dry clothes and facilities for sunbathe at day.

Sturdy and Stable: Our outdoor string light poles come with a long and thick 10.4 inch 5-jaw base that is sturdy and resistant to bending. This design prevents the pole from bending, breaking or swaying, even in strong winds, providing excellent wind resistance and reliable stability
Installation Steps: Threading, Securing & Testing Your Lights

Once you’ve got your spacing mapped out and your hooks or clips positioned just right, it’s time to actually get those lights up and working. I thread the string carefully along my planned route, making sure each section sits snug against my adhesive hooks or gutter clips. Here’s where patience pays off:
Threading string lights carefully along your planned route ensures each section sits snug against hooks or clips—patience truly pays off.
- Press adhesive hooks firmly for 30 seconds, then wait an hour before hanging anything
- Reinforce clips with zip ties in gusty areas to prevent sagging
- Check that your weatherproof power outlet reaches without stretching cords
Once everything’s threaded and secured, I plug into my weatherproof outlet and step back. I adjust any sag, straighten wobbly sections, and confirm the whole setup looks balanced. Testing first means you’ll catch issues before your guests arrive—and that’s when you’ll see the lights working as intended.

Keep your lights cord in place with our double hook clips:Conventional single hook design is often unstable when fixing, swaying from side to side, etc. The improved and upgraded outdoor light hooks design prevents the fixtures from sliding or sagging. You can adjust them to the most suitable height and enjoy the beautiful display effect.

ONE LIGHT CLIP HOLDS ROPE LIGHTS UP TO 3/8-INCH THICK: One package of Command Clear Outdoor Rope Light Clips includes 12 clips and 16 small water-resistant Command Strips; one light clip holds rope lights up to 3/8-inch thick

60 PCS Light Hooks Clips Per Box: Length 16mm/0.63inch, Width 15mm/0.59inch, Height 8mm/0.31inch; Suitable for cables with a diameter (maximum) of 5 mm/0.2 inches, size fits most wires, small size and space saving.
5 Installation Mistakes That Sag, Tangle & Fail

Why do so many beautiful outdoor light setups end up looking like droopy, tangled messes just weeks after installation? I’ve learned the hard way that common mistakes wreck even the best intentions. Tightening lights too much causes immediate sag—aim for 10–15% droop instead for that cafe charm we’re all after. Tangles happen when you skip the pre-planning step; I now label my wire runs and clip them organized before hanging anything. Weathering damage sneaks up fast without IP65+ outdoor-rated lights and a GFCI outlet protecting against moisture. Surface damage from nails defeats the whole rental-friendly purpose, so I stick with adhesive hooks and gutter clips. Finally, spacing clips just 12–24 inches apart prevents overload sagging. Small details matter, honestly, and they’re what separate your setup from frustration to something you’ll actually love.

Package Includes: Set of 100 gutter light clips keeps lights secure. This gutter clips kit for string lights holds decorations for clean displays at graduations, patio, pool, beach or 4th of July parties


High-Strength Metal Gutter Light Clips: Engineered from premium nickel-plated and manganese steel, these lightweight clips are a durable upgrade from break-prone plastic. Built for the outdoors, their sturdy construction stands up to the toughest conditions—including wind, snow, rain, and intense heat—with uncompromised performance.
GFCI Outlets & Electrical Safety Essentials

Getting your lights hung properly—without those installation disasters we just talked about—means nothing if you’re not protecting yourself and your setup from electrical hazards, and that’s where GFCI outlets come in. A GFCI outlet automatically shuts off power when it detects moisture or electrical imbalance, which is your best defense against shocks and fires outdoors.
Here’s what I do to keep my setup safe:
- Use weatherproof, IP65-rated cords and plugs that actually stand up to rain and dust
- Keep power sources elevated, away from grass and wet surfaces where shorts happen
- Verify your total light load doesn’t exceed your outlet’s capacity, preventing dangerous overheating
Investing in proper electrical safety makes your outdoor lighting setup reliable and secure.

Dual Motion Sensors & 3-Head Wide Lighting Design: intelamp solar lights outdoor feature dual motion sensors with over 180° wide detection, accurately sensing movement from both front and sides to enhance home security. The 3 adjustable light heads deliver up to 270° wide-angle illumination, making it an ideal solar security light for yard, patio, garden, and driveway.


【2ft Denser & Brighter Spacing】Loniuto's 72ft outdoor string lights are equipped with 36+2 high-quality LED bulbs. With bulbs spaced only 2 feet apart, they deliver a denser, fuller, and continuous stream of light. Featuring specially thickened warm filaments and a 2700K soft golden glow, they cast a delicate and even cozy radiance, instantly elevating the ambiance of any space.
Keeping Lights Safe in Rain, Wind & Cold

How do you keep those beautiful string lights looking gorgeous when Mother Nature throws everything at them? I’ve found that using non-permanent methods like adhesive hooks and gutter clips works well—they let you safely remove lights before storms or freezing temperatures roll in. Here’s what I do: I build in about 10–15% sag per span, which sounds weird, but it actually reduces strain when wind gusts hit. For weatherproofing, I secure all connections and cords away from wet surfaces, wrapping everything with weatherproof tape to block moisture. After each storm, I inspect for loose clips and retighten as needed. It’s honestly easier than you’d think, and your lights stay safe and looking good all season long.

【High-Strength & Rust-Resistant】Crafted from top-grade 304 stainless steel, our boat anchor is engineered for both saltwater and freshwater. Its robust construction ensures lasting strength and resistance to corrosion—keeping your boat secure season after season.

【Experience Unparalleled Anchoring Power】 This 17"-5/8" solid, one-piece 304 stainless steel spike/auger with a robust 5/8" OD and a three-turn design for extra grip. Our sand anchor's rings and rods are meticulously threaded then welded. The boat sand anchor pole go deep into in shallow water, beach or sandbar all has strong holding power.

Country Of Origin: Taiwan, Province Of China
Should You Go Permanent? What to Consider

Now that your lights are weatherproofed and secure, you’re facing the big question: do you drill those hooks in permanently, or keep things flexible with removable options—and honestly, the answer depends on whether you’re planning to stay put or might need to pack up someday? Permanent installations cost more upfront and leave marks on your space, but they’ll save you from re-hanging lights every season and won’t sag as much over time, whereas adhesive hooks and gutter clips let you reposition whenever you want without guilt (perfect if you’re renting or just indecisive). The right choice comes down to matching your setup to your lifestyle: long-term homeowners often prefer the durability and clean look of permanent mounts, while renters and folks who like to switch things up benefit from methods that keep walls and siding damage-free.

APPLICATIONS: Black coated stainless cable is easy to hide at night. Our light hanging kit can be used in multiple ways such as hanging string lights for a romantic party, photos or any hanging needed. And you can design different lighting suspension types to enhance the visual effect according to the layout of your yard. Our string light hanging kits is also suitable for Indoor: Hanging photo frames, dry clothes and facilities for sunbathe at day.
Convenient Firm Setup and Removeable Quick Clips: These energy efficient C9 LED Christmas lights feature spring-loaded clips that provide a convenient and firm setup. Compared with ordinary clips, the spring-loaded clips can more firmly and securely fastening the lights to various surfaces such as roofs, railings, or trees. The clips can also be easily removed if needed. Perfect for outdoor use

String Light Hanging Kit: This simple black cable kit is great for beginninger or as an addition to other DIY materials, it includes a 100 ft length wire rope cable, 1× M7 socket wrench, 20× U bolt saddle fasteners, 10× wire rope thimbles
Permanence vs. Flexibility Trade-offs
Before you drill that first hole into your patio or fence, you’ll want to think hard about what you really need—because once you’ve committed to permanent installations with screw hooks and tension cables, you’re basically saying goodbye to flexibility, and hello to some surface damage that’ll need patching later.
Here’s the real trade-off: permanent setups offer durability and wind resistance, but non-permanent options like adhesive hooks let you rearrange whenever you want. Temporary solutions work best if you’re renting or love switching things up seasonally.
Consider these priorities:
- Durability and stability through weather changes
- Easy removal without wall damage
- Quick repositioning for different layouts
The sweet spot? A hybrid approach combining temporary clips with lightweight cables. You’ll get reliable performance without sacrificing the flexibility to experiment and evolve your outdoor space.
Long-term Installation Cost Analysis
When’s the right time to spend big money on outdoor string lights instead of grabbing the budget option at the store? Here’s my take: if you’re staying put for multiple years, investing in IP65-rated lights with sturdy hardware pays off. I learned this the hard way—cheap adhesive hooks failed after one season, forcing replacements. Now, I budget around $100+ upfront for commercial-grade setups because they handle wind, rain, and temperature swings without sagging or burning out constantly. Sure, renters might stick with $25–$50 options using basic LEDs and adhesive hooks, no questions asked. But here’s the thing: quality installations reduce maintenance headaches significantly. Think about your climate, how long you’re staying, and whether you’d rather replace clips yearly or invest once and relax.
Aesthetic Quality and Durability Factors
Picture your outdoor space a year from now—are those string lights still glowing beautifully, or are they sagging, flickering, and held up by duct tape?
Here’s the real question: should you go permanent or stick with non-permanent mounting? I’ve learned that adhesive hooks and non-permanent methods let you change your mind without wall damage, but they can fail in freezing temps. Permanent installations look more polished, but they’re harder to remove.
The path to longevity? Weatherproofing everything. I’m talking IP65-rated components that laugh at rain and humidity.
Consider these factors:
- Proper sag and spacing (10–15% per span) creates that café-style vibe
- Quality hardware upfront saves replacement headaches
- Non-permanent options preserve flexibility without compromising style
Your lights’ll thank you.


