
I’d skip that single overhead light, honestly—it’s a flat-out recipe for shadows and gloom.
Instead, space multiple fixtures roughly half your room’s height apart for even coverage, then layer in task lamps near your reading spots and accent lights for artwork.
Aim for 2,500–5,000 total lumens depending on your square footage, and add dimmers to everything so you can adjust the mood throughout the evening.
This three-layer approach gives you balanced lighting, and there’s actually a lot more strategy involved in getting it just right.
Why Light Placement and Spacing Matter More Than You Think?

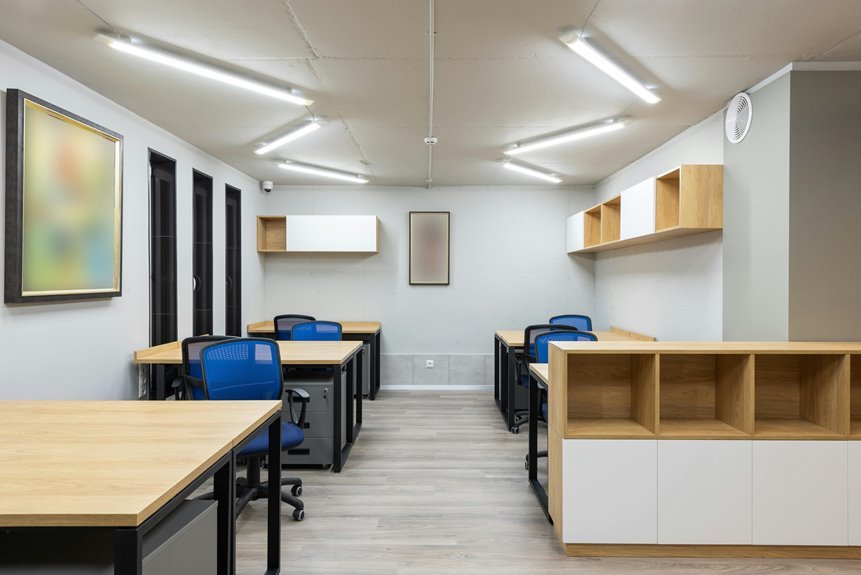
When you’re sitting in your living room at night, you’ve probably noticed how a single lamp can leave half the room looking pretty gloomy, right? That’s where smart light placement comes in. I’ve learned that spacing guidelines—dividing your ceiling height by two for fixture placement—actually prevents those annoying dark spots and harsh shadows we all hate. Here’s the thing: layering different types of lighting matters. You’ll want ambient lighting for overall brightness, task lighting for reading nooks or seating areas, and a focal point that draws the eye. Adding dimmer switches lets you adjust brightness for different activities, while maintaining 2–3 feet clearance from walls keeps everything comfortable. When you get this right, your living room becomes inviting—no dark corners, just a space where everyone feels welcome.
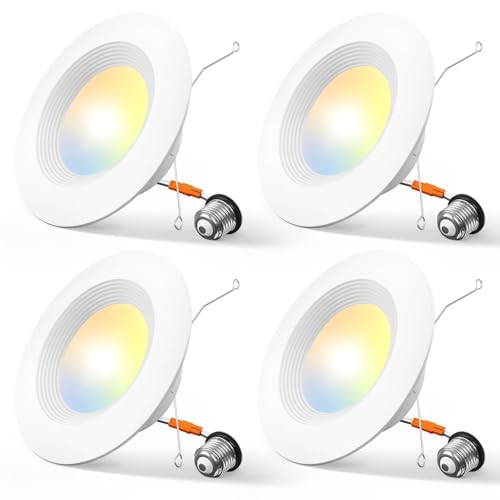
Eye protection: The brightness of the can lights can be smoothly adjusted from 10% to 100%, so you can choose the most comfortable brightness for your eyes. Note: This light is compatible with most dimmers on the market, except for the smart dimmer.

5 CCT-in-1: 5 color temperature(2700K, 3000K, 3500K, 4000K, 5000K) is selectable to you, which successfully eliminates the hassle of returning or exchange products due to inappropriate color temperature. Just slide the switch on the side of the J-box and you will get the most-desired color that best fit in your room type.

RETROFIT: Easy installation converts existing 5 in or 6 inch recessed lights to energy-efficient LED can lights without rewiring, fitting standard housings with secure torsion springs for reliable performance.
The Three-Layer Framework: Ambient, Task, and Accent Lighting

How’d you like your living room to feel—bright and energetic, or cozy and calm? I’ve learned that layering light through three distinct levels works well. Start with ambient lighting, your room’s foundation that spreads gentle, overall glow everywhere. Then add task lighting near reading spots or your favorite chair, keeping that focused beam below eye level so it won’t create glare. Finally, accent lighting highlights your artwork or architectural details, adding depth and visual interest to the space. You’ll want dimmer controls across all three layers, letting you adjust the mood whenever you need it. This isn’t about complicated setups—it’s simply smart lighting placement that actually works together.

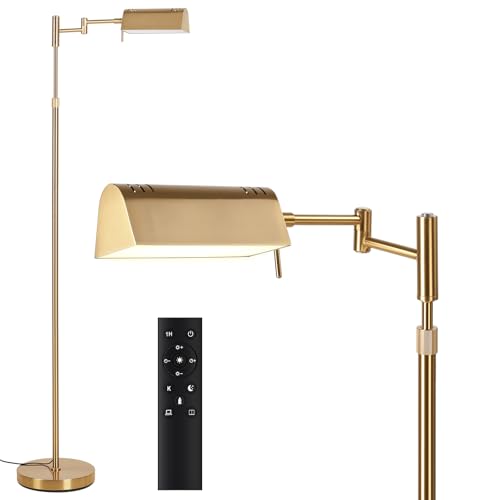
UPGRADED FLOOR LAMP 90% BRIGHTER THAN OTHERS: Our strong R&D team has upgraded the brightness and performance based on the same product on the market. Compared with other old model lamp 12W/1000lm, our new lamp 18W/1800lm is the first one to adopt LED technology with a light guide plate, which increases its brightness to 90% brighter than others. A best bright Lamp for living room bedroom, Also for LED lash light, nail light, tattoo lamp,sewing light, craft lamp and puzzle light.
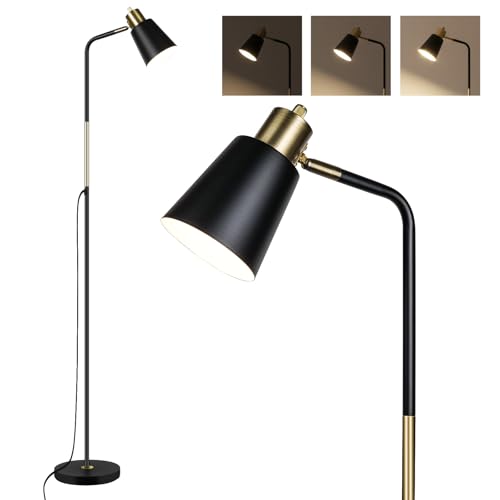
UPGRADED 3-LEVEL DIMMING: Our floor lamp lets you adjust the brightness with a simple turn. Rotate the switch clockwise to smoothly cycle through three distinct brightness levels—low, medium, and high—giving you full control from a soft night glow to powerful task lighting. Set the perfect intensity for any activity without ever having to leave your seat.
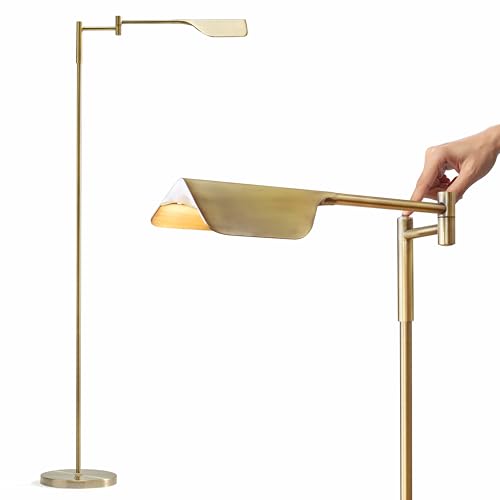
Super Bright Pharmacy Floor Lamp: Comfortably use this floor reading lamp over your chair to read books, sew, and engage with any other hobbies in a bright, efficient environment with Brightech LED office floor lamp. This standing task lamp offers a generous 1150 lumens of light (90W incandescent equivalent). With the Leaf's pharmacy shade that focuses the light on a narrow area, this office lamp is perfect for precise and detail-oriented tasks.
Build Your Ambient Foundation: Ceiling and Wall Placement

Since you’re laying the groundwork for your whole lighting scheme, getting ambient light right really matters—it’s the difference between a room that feels welcoming and one that feels, well, like a dentist’s office. I’ve found that spreading light around prevents those dark corners where nobody wants to sit.
Here’s what I’d recommend:
- Install ceiling fixtures spaced roughly half your room’s height apart for even coverage
- Add recessed downlights near walls for subtle grazing that creates depth without harsh shadows
- Mount dimmers on all ambient lighting so you can adjust brightness as evening fog rolls in
Lean toward warm 2700–3500K LEDs—they work well with those moody Monterey evenings. Skip the single central light, no, really. Multiple sources around your room let everyone feel included, tucked into their own cozy corner.

Multicolored Lighting: The main light of smart ceiling light is RGB+WW, while the back light is RGBIC. With 16 million background colors, the back light enriches the whole house atmosphere. Note: The WW of the main light and back light cannot be on simultaneously.
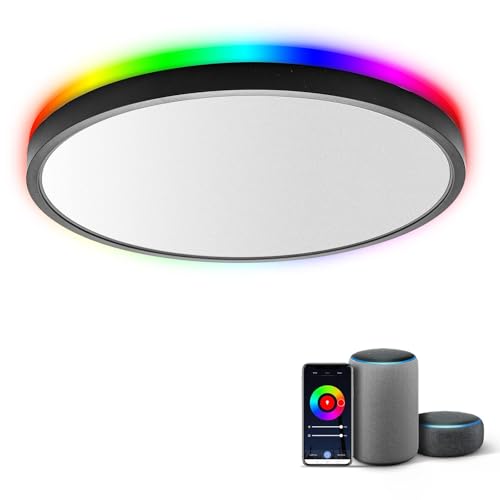
Why Taloya?【Advantage 1- The most convenient installation】: Spare three minutes to log into Youtube, and input “TALOYA Ceiling Light-G2” in the search to watch the whole easy Installation and Usage video. DIY friendly.【Warm Tips】: This LED flush mount ceiling light only works with standard ON/OFF wall switch as shown in the advertised pictures.

RGB Dimmable LED Lighting: Enjoy customizable ambiance with the built-in RGB LED light. Choose from a variety of colors and adjust the brightness to create the perfect mood for any occasion, Whether you're enjoying a relaxing evening at home or hosting a lively party, this modern ceiling fan creates the perfect atmosphere
Where Should Task Lamps Go? Near Reading Nooks and Work Areas

Now that you’ve got your ambient lighting creating that warm, welcoming foundation throughout your room, it’s time to layer in task lighting where you’ll actually be doing things—reading a novel, working on a laptop, sorting through mail.
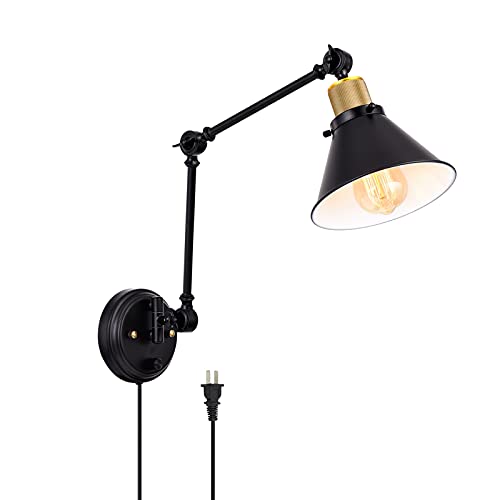
I’d place task lamps directly beside your reading nooks and work areas, positioning the shade bottom at or below eye level. This keeps glare off your pages or screen. Position your lamp so it lights your work surface without your own body casting shadows across it—that’s the sweet spot.
The key? Balance these focused task lamps with your ambient lighting so everything feels coordinated, not spotty. You’re creating dedicated pools of brightness exactly where you need them, turning any corner into a functional space.

High Bright Indoor Spotlight:5W CRI>90. The LED Indoor Spotlight features an aluminum housing that is rugged and can be placed anywhere for illumination. Spotlight with built-in COB chip, with optical soft lens, the lighting effect is very superior. The lamp body has good heat dissipation performance, and the service life is up to 50,000 hours

[3 Color Temperatures & Stepless Dimming] This wireless indoor spotlight features three color temperatures—warm (3000K), natural (4500K), and cool white (6500K). Long press for stepless brightness adjustment from 10% to 100%, perfect for use as a wireless plant spotlight, picture light, or accent lighting.

[3 Color Temperatures & Stepless Dimming] This wireless indoor spotlight features three color temperatures—warm (3000K), natural (4500K), and cool white (6500K). Long press for stepless brightness adjustment from 10% to 100%, perfect for use as a wireless plant spotlight, picture light, or accent lighting.
Highlighting Art and Architecture: Accent Light Techniques

I’ve learned that accent lighting makes your living room more visually interesting—and you’ve got some really effective techniques at your fingertips. Whether you’re using wall grazing to bring out the gorgeous texture of exposed brick, choosing the right fixtures to spotlight your favorite art, or strategically placing lights to create contrast between bright focal points and softer surroundings, you’re basically directing your guests’ eyes where you want them to look. The key? Make your accent lights about three times brighter than the regular ambient light around them, and suddenly your space feels organized, layered, and sophisticated.

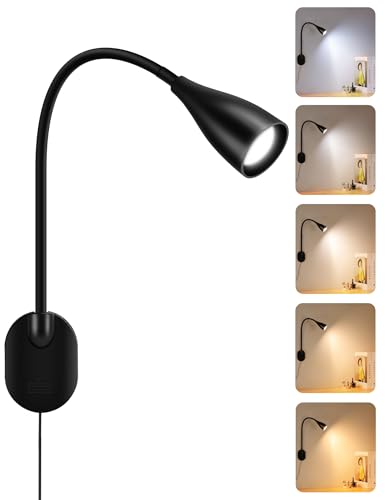
【Professional Eye-Caring Wall Lamp】Wall-mounted reading light with 14 premium SMD2835 LEDs delivers 3000K-6000K adjustable color temperatures, eliminating glare and flicker for bedtime reading. 10 dimming modes (10%-100%) adapt to late-night sessions while keeping bedrooms dark. Flexible 360° gooseneck focuses a 60° beam precisely on books without disturbing partners. Includes screw/tape mounting for headboards or walls.

【Professional Eye-Caring Wall Lamp】Wall-mounted reading light with 14 premium SMD2835 LEDs delivers 3000K-6000K adjustable color temperatures, eliminating glare and flicker for bedtime reading. 10 dimming modes (10%-100%) adapt to late-night sessions while keeping bedrooms dark. Flexible 360° gooseneck focuses a 60° beam precisely on books without disturbing partners. Includes screw/tape mounting for headboards or walls.
Dimmer On/Off Switch: The wall sconce come with a dimmer knob switch on the backplate, just rotate it to turn on/off light and adjust light brightness level 0-100% with a recommended bulb
Wall Grazing and Texturing
Want to make your brick fireplace or textured accent wall actually shine? Wall grazing is an effective lighting technique. I place a light fixture incredibly close to the surface, aiming it almost parallel to reveal every detail of your wall.
Here’s what makes wall grazing work for accent lighting:
- Position the light just inches from the wall, creating dramatic shadows that highlight texture
- Angle it nearly horizontal so you capture brick patterns, stone ridges, and architectural character
- Keep spacing tight; this isn’t wall washing’s wide, even coverage—it’s intentional drama
The contrast matters too. Your grazing accent should run about three times brighter than surrounding ambient light, establishing clear visual hierarchy. Unlike wall washing that makes rooms feel expansive, grazing emphasizes depth and dimension, drawing everyone’s eye exactly where you want it.
Accent Fixture Selection Strategies
Which light fixture you choose matters just as much as where you point it. Adjustable track lighting gives you the flexibility to highlight your favorite art or architectural features without permanent installation—useful when you’re still figuring out your space. Picture lights work well for framed pieces, casting focused illumination exactly where you want it. Light hierarchy matters: make your accent lighting about three times brighter than surrounding ambient light. This contrast creates visual drama and draws attention naturally. Whether you’re using wall grazing to reveal texture or wall washing for broader coverage, your fixture choice determines how effectively you’ll guide your guests’ eyes around the room.
Creating Visual Hierarchy Contrast
Now that you’ve picked out your fixtures, it’s time to make them work hard for you by creating real visual drama in your space. Here’s how I’d approach building that contrast:
- Layer your lighting: Start with soft ambient light as your base, then layer accent lighting that’s roughly three times brighter to draw eyes exactly where you want them.
- Reveal texture strategically: Use wall grazing near stone or brick to enhance architectural features, or try wall washing across smooth surfaces to make rooms feel larger.
- Spotlight what matters: Combine track lighting with picture lights for focal emphasis on artwork, ensuring your accent lighting outshines the ambient layer without overwhelming the space.
This contrast creates a room that feels deliberate and well-considered—a space where you truly belong.
Avoid Shadows: The 3-5-7 Fixture Placement Rule for Living Rooms

When you’re trying to banish those annoying dark corners and shadowy patches that make your living room feel gloomy, the 3-5-7 fixture placement rule is your lighting roadmap. Spacing your ambient, task, and accent lighting across the room—roughly dividing it into thirds—creates that balanced glow you want. You’ll need at least three fixtures for smaller spaces, working up to seven for larger rooms, which prevents those frustrating dark pockets behind furniture. The trick? Spread them out strategically so nothing feels clustered or harsh. Dimmable lights work well here, letting you adjust brightness and soften shadows when you’re settled in, making your space feel welcoming and shadow-free.

5-in-1 CCT: Eliminate the Guesswork. Because this recessed ceiling light features a 5-color switch on the J-box, you can physically toggle between 2700K Warm White and 5000K Daylight before installation. This means no more return hassles for buying the wrong color, ensuring the perfect ambiance for any room from a cozy bedroom to a bright, functional kitchen. Versatility is proven by the built-in dip switch supporting 2700K, 3000K, 3500K, 4000K, and 5000K.

DESIGN: Ultra-slim 6 inch led recessed lighting with canless construction eliminates housing requirements, featuring less than 1/2 inch profile for direct ceiling mounting in tight spaces and avoiding joists or ducting.

IC Rated: Amico's canless LED recessed light is IC rated, which is permitted to be in contact with insulations in ceilings, meaning the junction box is thermally protected. It only requires as small as 2 inches ceiling spaces, fits various ceilings, and joists. It won't cause a fire in the roof or overhead joist space.
Lamp Scale and Height: Avoiding Glare and Imbalance

Have you ever sat down to read under a lamp only to find yourself squinting at the bulb itself? That’s glare, and it’s totally preventable. Getting lamp scale and height right creates a more comfortable living room.
Here’s what works best:
- Position your shade at eye level when you’re sitting down—this prevents glare while keeping light exactly where you need it
- Match lamp size to your furniture; oversized lamps on small end tables look disproportionate
- Balance placement side-to-side so a floor lamp on one side has a table lamp opposite for visual equilibrium
The approach? Think of your room’s proportions as a puzzle. Taller ceilings call for taller lamps or multiple fixtures. When you nail this balance, lighting becomes invisible—you just feel comfortable, and that’s when you know the setup is working.
Super Bright & Eye-Caring: SUNMORY 16W/1500LM LED Pharmacy floor lamp offers stepless brightness dimming (10%-100%) and color temperature adjustment (3000K-6000K), letting you instantly switch between bright task lighting for reading, working, crafting, or sewing, and a soft ambient glow for relaxing. This dimmable floor lamp features a built-in 16W energy-efficient LED panel, ensuring flicker-free illumination while reducing eye strain.

120 LED High Brightness: Equipped with 120 high-brightness LED beads, the PACOVY floor lamp delivers a powerful 18W / 1800-lumen output, providing brightness equivalent to a traditional 120W bulb while saving up to 85% energy. This led floor lamp effectively illuminates the entire workspace, making activities such as working, reading, crafting, sewing, beauty treatments, nail art, tattooing, and puzzles easier and more enjoyable

Ultra Bright Lighting: Unlike other traditional floor lamps which are not bright enough, our bright floor lamp up to 2000 lumens is enough for reading and working in the living room or bedroom, illuminating any corner of your room. 20 watts LED arc floor lamps(100W Equivalent), with 50000hrs Long lifespan, you don't need to bother to replace any bulbs, bringing more convenience and brightness to your daily needs.
How to Create Zones: Strategic Placement That Defines Living Spaces

I’m going to show you how strategic lighting can define your living room into distinct zones, each with its own personality and purpose. When you layer light sources around your activity hubs—say, a reading nook by the sofa or a conversation area near the TV—you’re establishing what each space should accomplish, which makes the whole room feel more deliberate and welcoming. By positioning task lighting where people actually sit and using ambient light to fill in the gaps, your living room naturally divides itself into functional areas that work well together.

Night light Feature: 4 inch led recessed light in night light mode emits 2000K amber for very soft illumination and added ambiance. It also can provide no-glare lighting when you wake up at night which is very convenient.

Night light Feature: 6 inch led recessed light in night light mode emits 2000K amber for very soft illumination and added ambiance. It also can provide no-glare lighting when you wake up at night which is very convenient.

Voice&APP&Remote Control: 52 inch indoor smart ceiling fan supports voice control, easily compatible with Wi-Fi, Alexa and Google assistant, allowing you to adjust the fan light completely free your hands. It also enables APP and remote control(handheld and wall mounted), it is necessary to turn on Bluetooth when operating via the APP. So you can keep track of the status of the fan light in your home at any time, bringing you a comprehensive and convenient control experience
Identifying Activity Hubs
Picture this:
- Your reading nook by the window, where you settle in with a book and need focused task lighting
- The conversation zone around your sofa, requiring balanced ambient lighting and dimmers for flexibility
- The TV area, demanding softer eye level lighting to prevent glare during movie nights
Once you’ve identified these zones, you’ll know exactly where to place your lights. Task lighting within arm’s reach, ambient lighting spreading evenly throughout, and dimmers controlling everything—that’s how you build spaces where you actually want to spend time.
Layering Light by Zone
Why does one bright overhead light never seem to work for your whole living room? Because you’re not thinking in zones. Light layering works by creating distinct areas—a reading nook here, a cozy seating spot there. You’ll want ambient lighting as your foundation, then layer in task lighting for focused activities. Wall sconces define boundaries between zones beautifully, while recessed lighting keeps shadows at bay when positioned 2–3 feet from walls. Position task lights at eye level, aiming toward seating to eliminate glare. This zoning approach means you’re not blasting one bright light everywhere; instead, you’re creating a warm, welcoming living room where every corner serves a purpose.
| Zone Type | Light Layer | Fixture Type | Height | Purpose |
|---|---|---|---|---|
| Reading Nook | Task | Floor/Table Lamp | Eye Level | Focused Reading |
| Seating Area | Ambient | Ceiling Light | Center | Overall Glow |
| Display Wall | Accent | Wall Sconce | Mid-Wall | Highlight Features |
| Corner Space | Ambient | Recessed Light | 2–3 ft. from Wall | Even Distribution |
| Transition Area | Accent | Wall Wash | Variable | Zone Definition |
Test Your Placement: How to Adjust Lighting Before Finalizing?

Before you commit to buying that floor lamp or screwing in another bulb, take a moment to actually live with your lighting setup first—because what looks good in theory doesn’t always feel right when you’re settling in with a book or hosting friends on a Saturday night.
What looks good in theory doesn’t always feel right when you’re settling in with a book or hosting friends.
I’d suggest testing your placement this way:
- Use portable lamps temporarily to find your sweet spots before installing anything permanent
- Sit in your favorite chair at different times, checking if task lighting hits right and shadows disappear
- Invite people over and watch where they naturally gather, adjusting ambient lighting accordingly
Turn your dimmers up and down throughout evening hours. Notice how layering of light affects your space’s mood. This hands-on approach to lamp placement helps you achieve balanced brightness that actually works for your life, not just Pinterest.
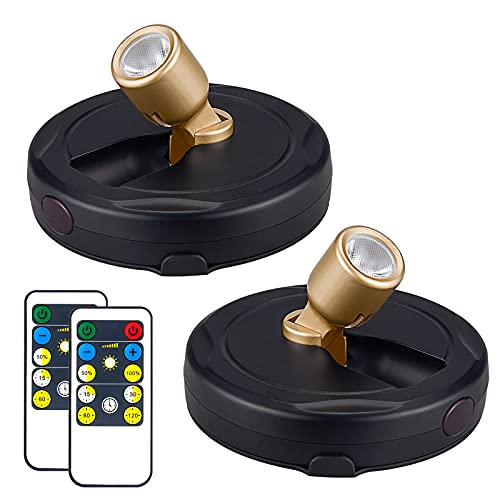
Remote Control Battery Spotlights: You can press the light switch button to turn the light ON/OFF or use the remote, operate portable spotlight within 18 ft. Nice low light as wall closet light or to spot light art or other item

⏰【Smart Daily Auto Timer】Set it once and your indoor spotlight turns on and off automatically at the same time every day—no manual switching needed. Choose from 1H, 2H, or 3H timer options to create a consistent lighting routine for plants, wall art, or display areas. Perfect for effortless ambient lighting that runs quietly in the background.

Perfect Spot Lights Indoor: 2 pack 3W 3000K warm white LED spot lights indoor, aluminum body and optical soft spot lens, perfect for accent lighting indoor. Suitable for bedroom, living room, hallway, corridor, porch and so on.
How Much Light Does Your Living Room Need? Calculating Lumens for Your Space

How do you know if your living room’s actually bright enough, or if you’re just squinting through the gloom? I’d start by calculating your square footage—multiply length times width—then apply the 10–20 lumens per square foot guideline. A 250 sq ft living room, for example, needs roughly 2,500–5,000 total lumens as your baseline. This range gives you flexibility depending on your vibe and activities. Here’s the trick: I use dimmable fixtures to adjust brightness throughout the day. They’re useful for creating the right lighting layout without buying extra lamps. Your chosen lumens per square foot target should match how you actually live—whether you’re hosting gatherings or curling up with a book. Start conservative, then dial it up as needed.
【Smart Auto-Off Bedside Light】Ideal bed lamp for headboards featuring 14 ultra-bright LEDs and 0.5-hour auto-shutdown timers. Slim-profile wall mount lamp offers 5 touch-sensitive brightness levels (3000K warm to 6500K daylight) . Bendable goose neck directs narrow-beam illumination to books while maintaining bedroom darkness.

【Wide illumination & Eye Protection】deeloop LED Wall Mount Reading Light Modern yet powerful, the wall reading light offers abundant illumination to cover your entire area.Its soft, non-glaring wall lamp, combined with an eye protection feature, ensures a comfortable experience and optimal lighting.

Sleek Minimalist Design: Tired of bulky wall sconces? This low-profile wall-mounted reading light features a sleek black finish and a precision-machined aluminum body, offering the understated luxury of high-end hotel lamps. Headboard reading light blends seamlessly into your bedroom, studio, or living room, maintaining a clean and elegant space
Dimmer Control: Making Your Layout Flexible and Mood-Responsive

Once you’ve figured out how many lumens your living room needs, dimmer control lets you actually adjust them—and that’s where the real benefit comes in. I’ve found that dimmer control gives you flexibility, letting you shift from energizing brightness to cozy softness whenever you want.
Here’s what makes dimmers valuable:
- They reduce eye strain and glare while keeping enough light for whatever you’re doing
- Smart dimmers connect with automated scenes—Movie Night activates the right ambiance instantly
- Layered lighting (ambient, task, and accent) becomes adjustable across your flexible layout
Pair dimmers with dimmable LED bulbs, and you’ll save energy while maintaining consistent color. This combination lets you control your mood as easily as adjusting a dial. That’s the real payoff of thoughtful lighting design.
Common Placement Mistakes and How to Fix Them

Why do so many living rooms end up feeling either too dark in the corners or weirdly flat and shadowless all at once? I’ve noticed the culprit: relying on one overhead light. That single fixture creates harsh shadows and kills the welcoming atmosphere you’re after. Here’s what I do instead—I layer my ambient lighting with wall lights and task lighting positioned strategically around the room. I keep fixtures at least two to three feet from walls, which prevents glare and shadows from settling in those neglected corners. Then I add dimmers. With dimmers, I adjust the mood whenever I want, blending my three light sources together. This approach makes your space feel more inviting.
Tuning for Warmth: Balancing Color Temperature and Brightness

- Choose warm LEDs in the 2700–3500K range for ambient lighting that creates a comfortable, enveloping glow throughout your space
- Layer task lighting below eye level with your ambient sources, so reading feels natural, not strained
- Install dimmer switches to shift brightness from day to evening, letting you control the mood whenever you want
Brightness and color temperature work as a team. You’re not stuck with one rigid setting—you’re creating an invitation for people to relax.


