
First, flip off your wall switch and kill power at the circuit breaker—safety first, no, really. Grab a ladder, gloves, and your replacement bulb (matching the wattage, please).
Find your lantern’s access point: hinged door, bottom finial, or removable panel. Unscrew the old bulb counterclockwise, then screw in the new one clockwise until snug. Close everything back up, restore power, and test your light. Each step is straightforward, but there are details to get the job done correctly.
Turn Off Power Before Changing the Bulb

Why’s the first step all about power? Because electricity and you don’t mix well, no, really. I always start by flipping the wall switch off, then I head to the circuit breaker to kill power completely. This outdoor power shutoff is your best friend—it’s the difference between a simple bulb change and a trip to the emergency room.
Here’s what I do: I turn off power at the circuit breaker, wait a moment, then grab my voltage tester to confirm the fixture’s actually dead. No voltage means I’m safe. If you’ve got a dimmer or smart switch controlling that hanging lantern, disable the entire circuit. Safety precautions like these sound fussy, but they’re worth those few extra minutes.

【3 LIGHTING MODES】The pure white light comes with 3 modes: Full brightness, half brightness, SOS flashing, which can illuminate a large area, or create a flashing party atmosphere. Just select your preferred mode according to different kinds of activities by pressing the round push button.
3 Lighting Modes: Low beam 80 lumens – 6000K daylight white, last 10 hours. Low beam 80 lumens – 3000K soft white, last 10 hours. High beam 140 lumens (15W incandescent equivalent) – 5000K Cool White, last 5 hours.
Gather Tools and a Replacement Bulb

Before you climb that ladder, you’ll want to gather a few essentials—a sturdy step stool or ladder, work gloves or a microfiber cloth (so you don’t leave fingerprints on the glass), and most importantly, the right replacement bulb that matches your fixture’s wattage and base type. Take a quick look at how your lantern opens—whether it’s got a bottom finial you unscrew, a hinged door, or removable panels—because knowing this ahead of time saves you from fumbling around up there. Depending on your fixture’s design, you might also need a screwdriver handy to loosen any housing or panels, so grab one just in case.

Premium Material:The outer of light socket is made of high quality phenolic material with aluminum socket interior which is solid enough for using a long time.

✅ EASY COMPATIBILITY: Designed to mount securely to 3" pole outdoor post light fixtures and support replacement light globes with a 5.25" neckless opening. Ideal for upgrades, repairs, or new installs.

Energy Efficient LED Warm White Bulbs: Package includes 25 Pack C7 LED bulb features a sparkling diamond-clear finish that enhances light reflection, creating a crisp, elegant glow for holiday and decorative lighting. Each 0.6W energy saving C7 led replacement lights bulb save up to 90% on electricity compared to traditional incandescent bulbs while delivering bright, consistent illumination. Rated for 25,000+ hours of use, no more constant replacements!
Essential Tools Required
What’s gathering before you climb up that ladder? You’ll need a few essentials to make this job smooth and safe.
First, grab these tools:
- A sturdy step ladder (seriously, don’t skip this)
- Work gloves and a microfiber cloth for handling your bulb
- A screwdriver if your lantern needs securing
Now, here’s the important part—get yourself an outdoor-rated, LED bulb that matches your fixture’s base type. LED bulbs last longer and perform better outside. Check whether you need weather-resistant or damp-rated specifications; moisture damage isn’t fun. Also, verify compatibility with any dimmer switches or motion sensors you’ve got installed.
Using gloves or that cloth prevents skin oils from transferring to the glass, which keeps everything working great. Having everything ready before climbing saves you time and frustration.
Selecting the Right Bulb
How many times have you grabbed the wrong bulb and had to make a second trip up the ladder? It’s frustrating, but here’s what helps. Before climbing back up, grab an outdoor-rated bulb that matches your lantern fixture’s specifications. Check the bulb base type—whether it’s E26 medium or candelabra E12—so it fits perfectly without forcing. I’d recommend choosing an LED because they’re built for weather resistance and last way longer than old incandescent bulbs. They’ll reduce your future trips significantly. If your lantern has dimming capability, confirm LED compatibility to avoid flickering issues. Take two minutes comparing the wattage and base type on your old bulb with the new one. Getting this right means smooth sailing when you’re up there.
Safety Equipment Checklist
Now that you’ve got the right bulb picked out, you’ll want to round up everything else you need before you climb that ladder—forgetting something halfway up is no fun. Here’s what I always gather before tackling outdoor lighting projects:
- Safety glasses and work gloves to protect your hands and eyes
- A voltage tester to confirm the circuit’s actually off (don’t skip this)
- A sturdy step ladder on solid, level ground, plus a flashlight or headlamp
You’ll also need a screwdriver—Phillips or flathead depending on your lantern—to access the housing. Check the weather too; you want clear skies and dry conditions for bulb replacement. These safety equipment basics might seem like overkill, but they’ll keep you confident and secure while you’re up there working on your outdoor lighting.
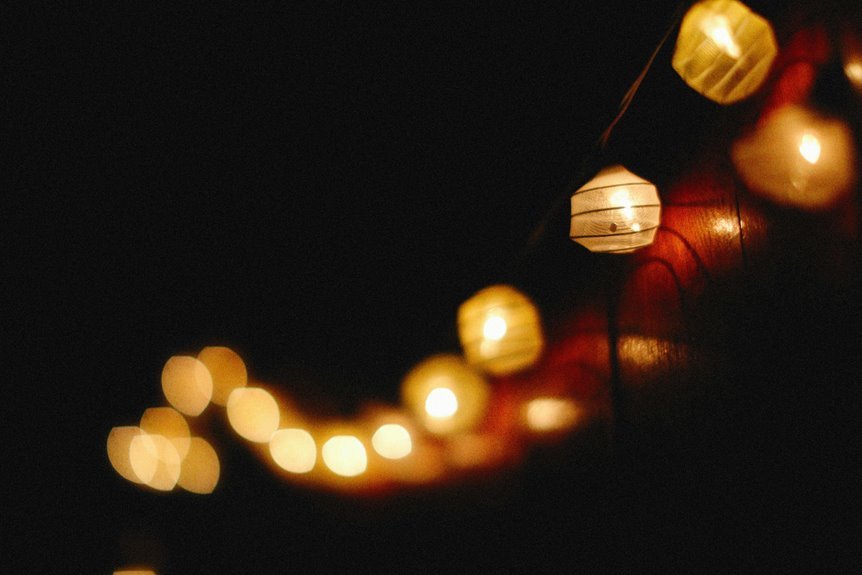
Identify Your Lantern’s Bulb Access Point
Where’s the access point to your lantern’s bulb? Every outdoor hanging lantern has its own design, so examine yours carefully. Check for a hinged door on the side—this is a common access method. Look at the bottom finial—twisting it might loosen and release the lower portion to reveal the bulb. Notice clips or latches near the top? Those open access. See a removable glass panel? That’s your access point. Sometimes the entire glass enclosure can be removed once you loosen the lantern itself. Examine every angle, every corner, and every potential opening. Your bulb access point is there—you simply need to identify it.
Weather-Resistant Outdoor Wall Lanterns: Constructed with a sturdy metal frame and thickened glass panel, this outdoor wall sconce is waterproof and built to withstand sun, rain, snow, and ice. The high-quality metal helps prevent rust and corrosion, making it suitable for long-term outdoor use.

Built to Last: Constructed from durable steel with a weather-resistant white finish for long-lasting outdoor performance

CUTE SIZE: 8.46 x 6.1 x 4.72 inches. The outdoor wall lantern is not big. Before purchasing, please kindly double check this size is what you want.
Access the Lantern and Locate the Bulb

Now that you’ve spotted where your lantern opens up—whether that’s the top, bottom, side, or somewhere sneaky—it’s time to actually get in there and find that bulb hiding inside. I’m going to walk you through figuring out your specific lantern style, locating exactly where that access point is (no, really, some of these things are cleverly designed), and getting everything ready so you can swap out the old bulb without any frustration or dropped pieces.

Universal Compatibility : Our step ladder covers fit most commercial step ladders for enhancing safety. Featuring strong elastic straps, these ladder feet are easy to install and keep ladder securely in place, minimizing the risk of displacement.

Designed to snap over extension ladder rail end caps

Helps stabilize your ladder while protecting support surfaces
Identifying Your Lantern Type
How’d you think that bulb got in there in the first place? Your lantern’s got a specific way it opens, and finding it saves you time and frustration. I’ve learned that outdoor lanterns come in three main varieties:
- Removable glass panels that slide off the sides or bottom
- Hinged doors that swing open like little cabinets
- Bottom finials you unscrew to access the bulb chamber
Look closely at your fixture’s edges. See tiny black nuts or screws near the top? Those little guys control lantern access and bulb access entirely. Run your fingers around the seams, checking for hidden clips or acorn nuts. Once you identify whether you’re removing a glass panel, opening a hinged door, or twisting that bottom finial, you’re basically there. No, really—that’s half the battle done.
Finding The Access Point
Once you’ve figured out what type of lantern you’re working with, it’s time to actually get inside the thing—and it’s easier than it sounds. Every outdoor hanging lantern has an access point; you just need to find yours. Look for removable tops, hinged doors, or side panels that open up. Some designs feature bottom access, where you’ll unscrew a finial to loosen things. Others let you turn the top hoop to detach the entire fixture from its mounting. Here’s the important part: safety before changing anything, always verify complete disengagement of components. Once you’ve loosened or removed what needs removing, an additional 1/8 turn often fully exposes your bulb. Take your time locating this access point—you’re almost there.
Preparing For Bulb Removal
Ready to actually see what you’re working with? Now comes the fun part where safety meets access. I always switch off power at the circuit breaker first—no, really, this matters—then I wait a few minutes for that bulb to cool down completely. Burnt fingers aren’t ideal.
Next, I set up my sturdy ladder directly beneath the outdoor hanging lantern. Here’s what I focus on:
- Positioning the ladder on level ground for stability
- Standing at a comfortable height to reach the lantern safely
- Keeping my balance while accessing the bulb removal area
Once I’m positioned securely, I locate my access method and open it fully. Whether it’s a bottom finial I’m unscrewing or a hinged door I’m swinging wide, exposing that bulb housing is necessary before attempting any bulb removal.
Remove and Replace the Old Bulb

Why does this part feel like the most challenging step? Well, you’re working up high with something fragile, and honestly, it requires some care. Make sure your power’s off at the switch—no, really, don’t skip this. Once you’ve waited for that bulb to cool, carefully unscrew the old bulb counterclockwise using gloves or a rubber grip if it’s stuck tight. Take your time; we’re avoiding breakage here. Thread your new bulb clockwise until it’s snug, but don’t overtighten it—that’s the right balance. Before you finish, double-check that your replacement matches the outdoor hanging lantern’s wattage and base type. Getting these details right means you’re following best practices for this task.
| Step | Action | Tip |
|---|---|---|
| 1 | Power off | Use circuit breaker |
| 2 | Cool bulb | Wait 15 minutes |
| 3 | Unscrew | Turn counterclockwise |
| 4 | Install new | Turn clockwise |
| 5 | Verify specs | Check wattage |

NON-CONTACT DETECTION of AC voltage in cables, cords, circuit breakers, lighting fixtures, switches, non-tamper-resistant outlets, and wires

Neon Light Indicates Presence Of Ac Voltage From 80-250 Vic

VERSATILE VOLTAGE DETECTION: This Voltage Tester offers non-contact detection of low voltage in security, entertainment, communications, environmental control, and irrigation systems
Install the New Bulb and Close the Lantern

Now that your new bulb’s firmly in place, it’s time to put your lantern back together. This part is straightforward.
Carefully reassemble your outdoor hanging lantern by:
- Replacing any glass panels or covers you removed earlier
- Tightening the bottom finial or securing clips snugly
- Checking that the weatherproof seal sits properly in its groove
Once everything’s sealed up tight, flip the power back on at your circuit breaker or switch. Give that new bulb a quick test run—you’ll know right away if the installation is successful. When that light turns on, you’ve completed the bulb replacement. Your lantern is ready for use again.

【Battery Operated Convenience】: Enjoy hassle-free lighting with these hanging pendant lantern lights that are powered by batteries, eliminating the need for outlets or wiring.

SOLAR PLASTIC WALL HANGING LIGHTS: 2 pack modern wall mount lights powered by solar, each with a large warm white LED Edison bulb, they are the ideal decorative outdoor lighting ensure a great effect when the light glows in the dark. Lantern Measurement - 4.9 x 4.9 x 6.2 inches

Bright 360-Degree Lighting: Illuminate your surroundings with unparalleled brightness and coverage using advanced LED light bulbs designed to emit a bright and uniform 360-degree light.
Restore Power and Verify It Works

How’s your moment of truth feeling? Now comes the fun part—actually seeing your handiwork pay off. Head back inside and flip that circuit breaker to the ON position, or if you switched off the porch light instead, flip it back on to restore outdoor power. Wait a few seconds, then test the light by toggling your wall switch. That satisfying glow is your signal of success. If nothing happens, don’t panic. Double-check your bulb seating—sometimes it just needs a tiny twist. Verify you’ve got the correct type and wattage for your lantern. For fixtures with safety sensors, check that they’re not blocking the circuit. You can handle this, and soon you’ll be enjoying that beautiful outdoor ambiance.

✅ EASY COMPATIBILITY: Designed to mount securely to 3" pole outdoor post light fixtures and support replacement light globes with a 5.25" neckless opening. Ideal for upgrades, repairs, or new installs.
【High Quality】This Fog Lights are made of Special Housing which is Resistant to Water, Impact, anti Corrosion, Long Lasting, and Durable. 100% Advanced chips add visibility crucial in Navigation Poor Weather Conditions, Including Rain And Snow, as Well as Dense Fog. Last more than 50,000 Hours.

Fits Standard 3-Inch Post Light Fixtures: Features a standard 3-inch diameter fitter compatible with most outdoor post-top lanterns and post lights, providing a secure mounting solution for landscape and exterior lighting fixtures (light fixture sold separately)


